

A detailed guide explaining how to delegate Kava using Trust Wallet
In this article, you’ll find a quick overview of Kava Labs, the Kava Platform, and its native asset $KAVA. Additionally, we’ll be illustrating step-by-step, how to stake your $KAVA using the Trust wallet and Cosmostation.
Let’s kick off with an overview of Kava Labs, the company, and the team behind the creation of Kava’s DeFi Platform. Kava Labs’ mission is to democratize financial services and make them available to everyone, wherever in the globe. The team began by developing the Kava blockchain, a fundamental platform meant to deliver the safest, most secure, and dependable experience for accessing Decentralized Financial (DeFi) apps and services. Today, the platform manages over $1 billion in assets on behalf of its users and is rapidly expanding.
The Kava blockchain is a lightning-fast Layer-1 blockchain featuring a developer-optimized co-chain architecture that combines the two most used permissionless ecosystems — Ethereum and Cosmos — into a single, scalable, network. The blockchain offers a DeFi platform for multi-collateralized loans and stable coins for crypto assets. You can access the Kava DeFi Platform here.
Since its emergence, the Kava blockchain and thus ecosystem has rapidly expanded itself. The ecosystem now has different infrastructure projects among which the Akash Network, multiple cross-chain bridges, DeFi apps, insurance apps, wallets, and more. For a full overview of the ecosystem, click here.
To power, the Kava ecosystem, a Proof-of-Stake Tendermint-based consensus mechanism, and the native asset $KAVA have been created. Every $KAVA holder can delegate their assets to Kava Validators, thus ensuring the security of the network and earning rewards. So, let’s have a look at how to delegate.
Delegating $KAVA With Trust Wallet
Trust Wallet is available to download via their website, the Apple App Store, or for Android in the Play Store. It’s worth noting that all interfaces work the same, whether you’re using the Android, iOS or dashboard version. To get started, download the app.
The app will remind you that if you lose your private key, your funds will be lost forever, so pay attention to that and write your seed phrase then accept the terms and conditions.
- Go to Settings in the lower-left corner and tap “Wallets”.
- Click the + button to add a Kava address allowing you to send, receive, or stake your Kava tokens.
- In the wallet section, you can see all the cryptocurrencies or tokens supported by your wallet.
- Discover tab will show you what you can stake, DeFi Tokens, and lending/borrowing options.
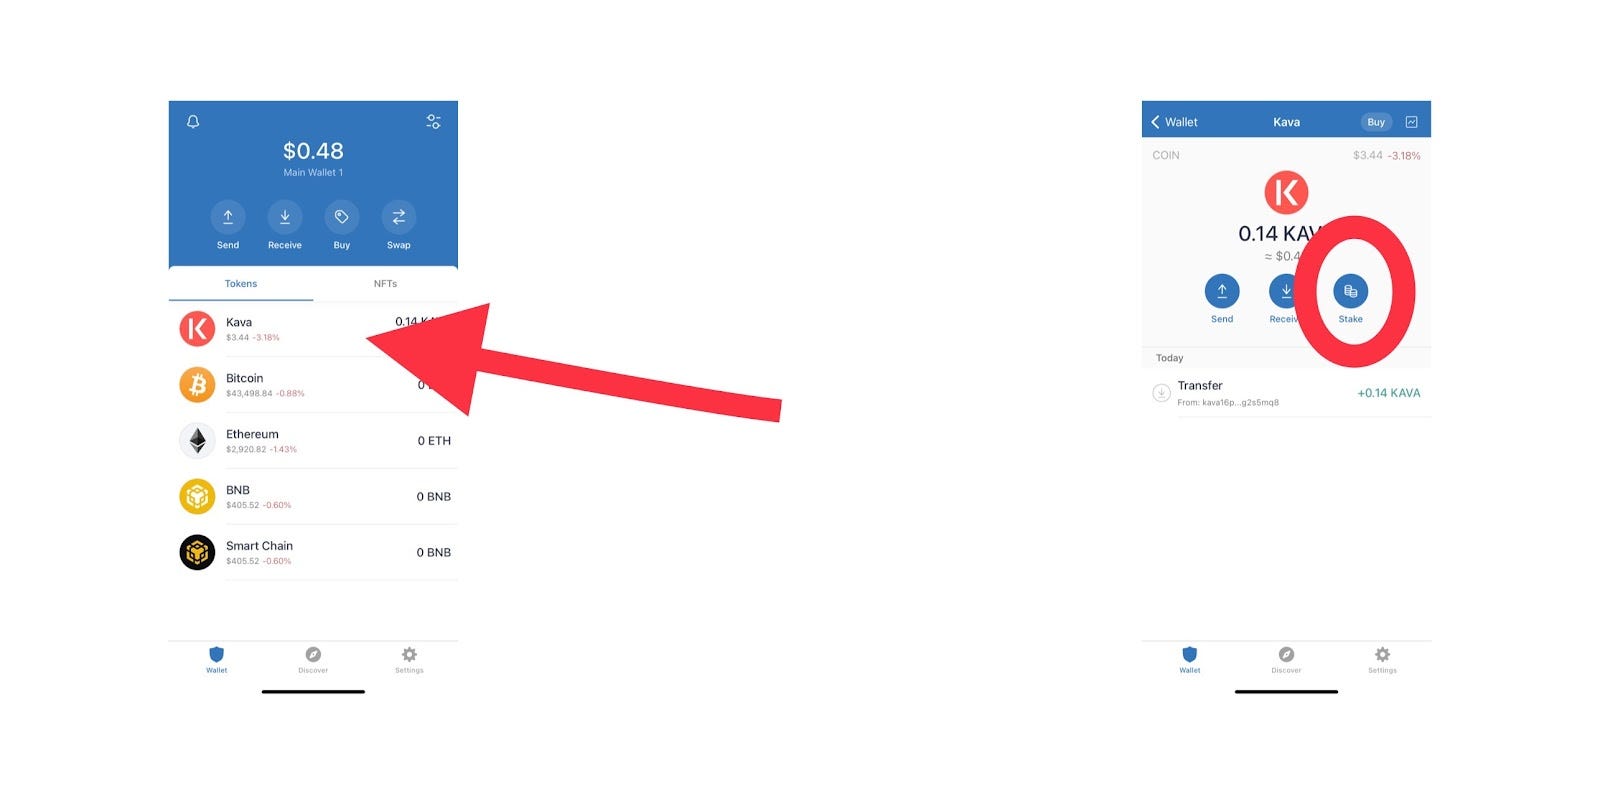
Once you have added your Kava wallet and sent some tokens to it, you can stake your tokens and earn additional rewards.
Now to the fun stuff, go to your Kava wallet tap on “Stake” to start staking your Kava assets.
To stake, click on “More,” and then choose a Validator operating on this protocol.
Select your validator wisely as there is a risk of slashing in case of security or liveness faults(double signing, lousy behavior) from the validator you have selected. You can know more about selecting a Validator in our article here.
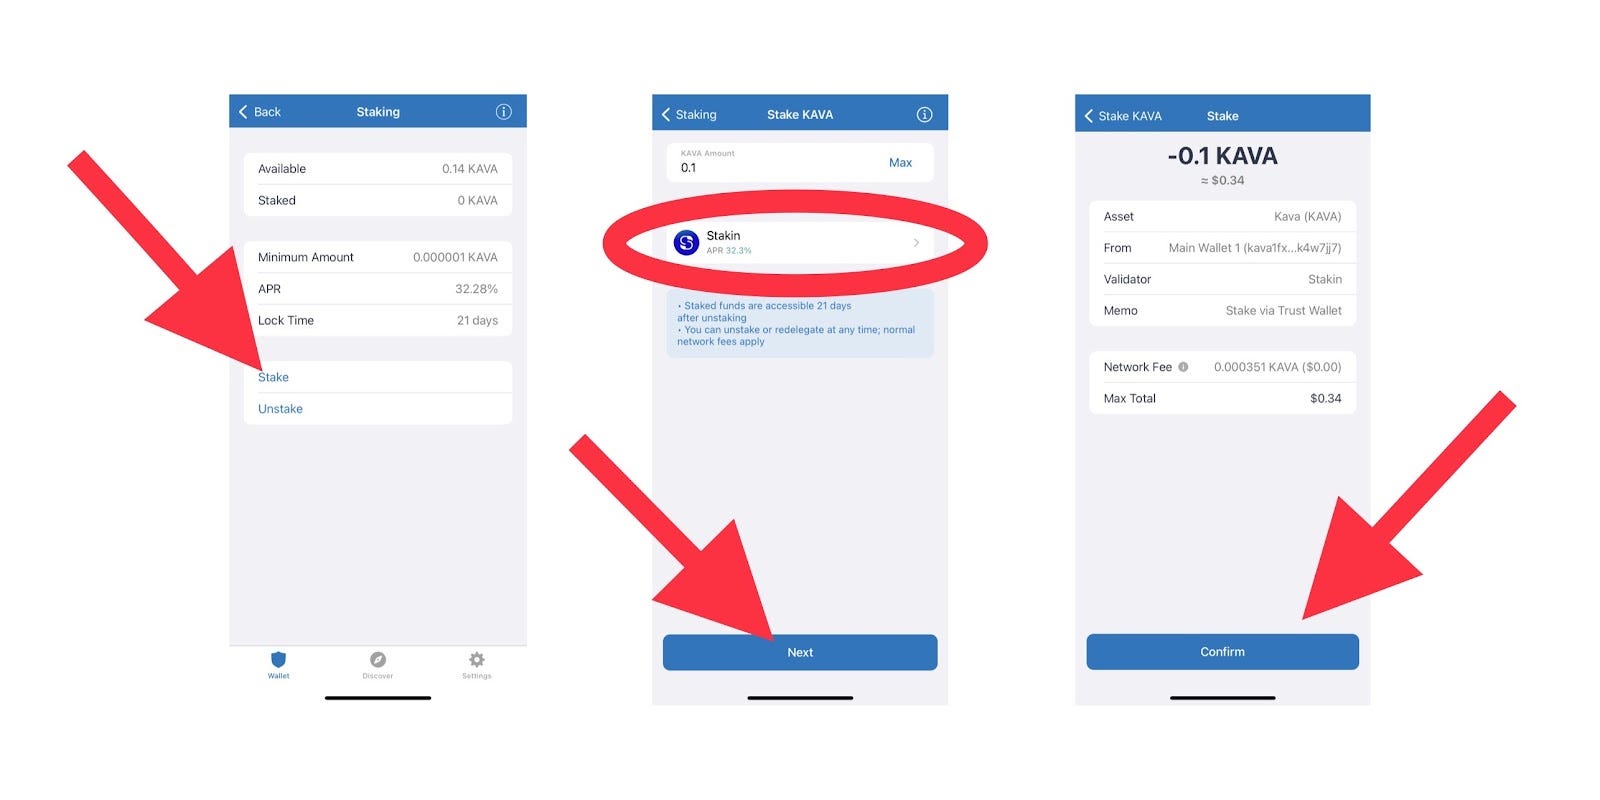
Once you approve the transaction, it will take a couple of seconds before you see the rewards coming in.
Claiming Rewards With Trustwallet
Once the amount of gathered rewards is to your liking (or higher than the claiming fee), it’s time to start claiming. Within the Trust Wallet app, select “Kava”.
Next, the Kava dashboard will open. On the dashboard, select “Stake” as with the previous steps. You will see four options here:
- Stake
- Unstake
- Redelegate
- Claim Rewards
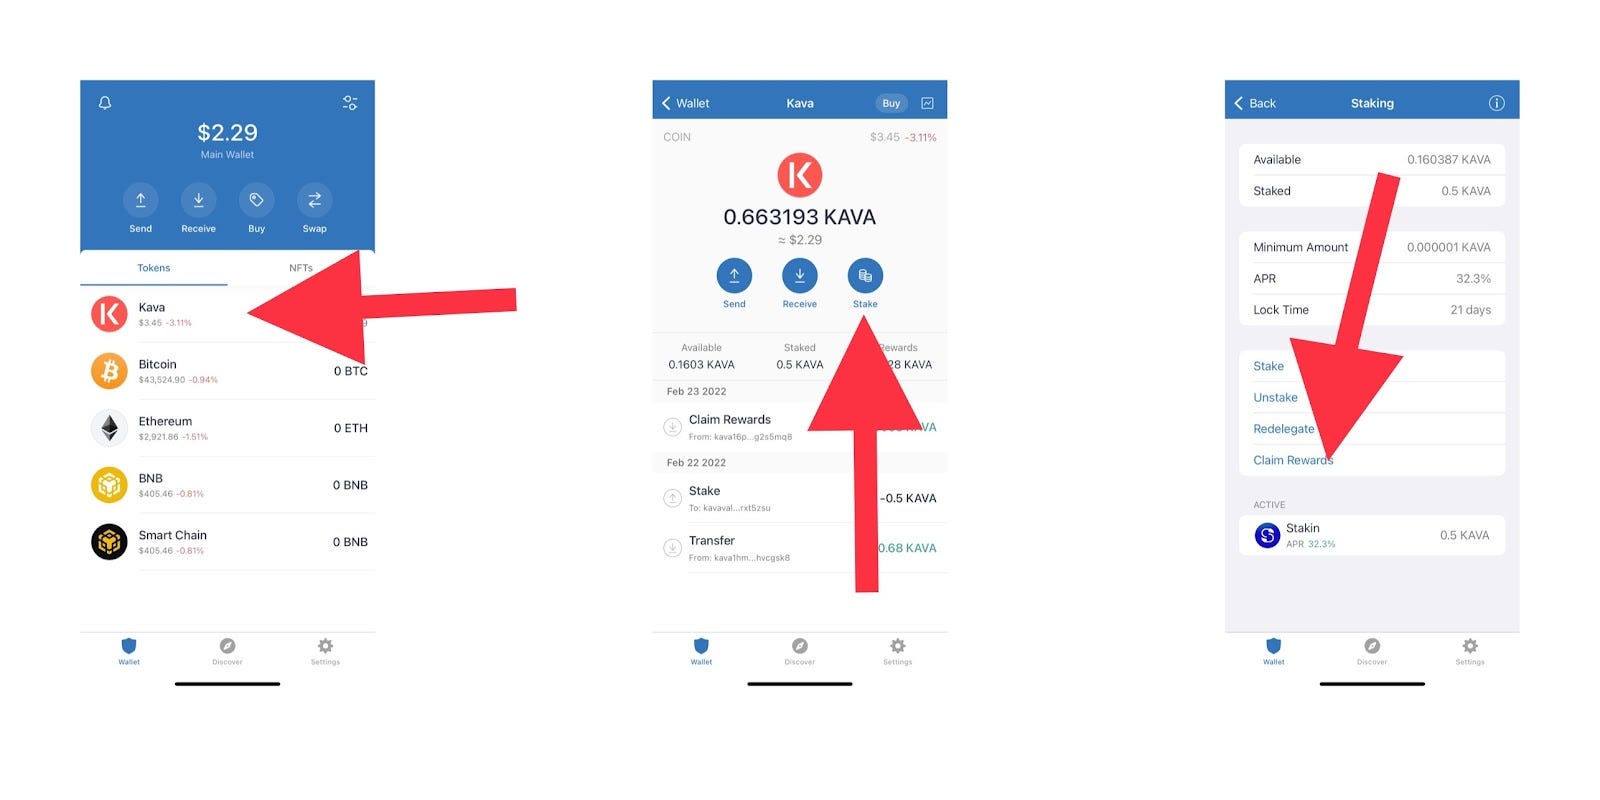
Click on “Claim Rewards” to go to the transaction details screen.
When you are done reviewing all the information, just click “Confirm”.
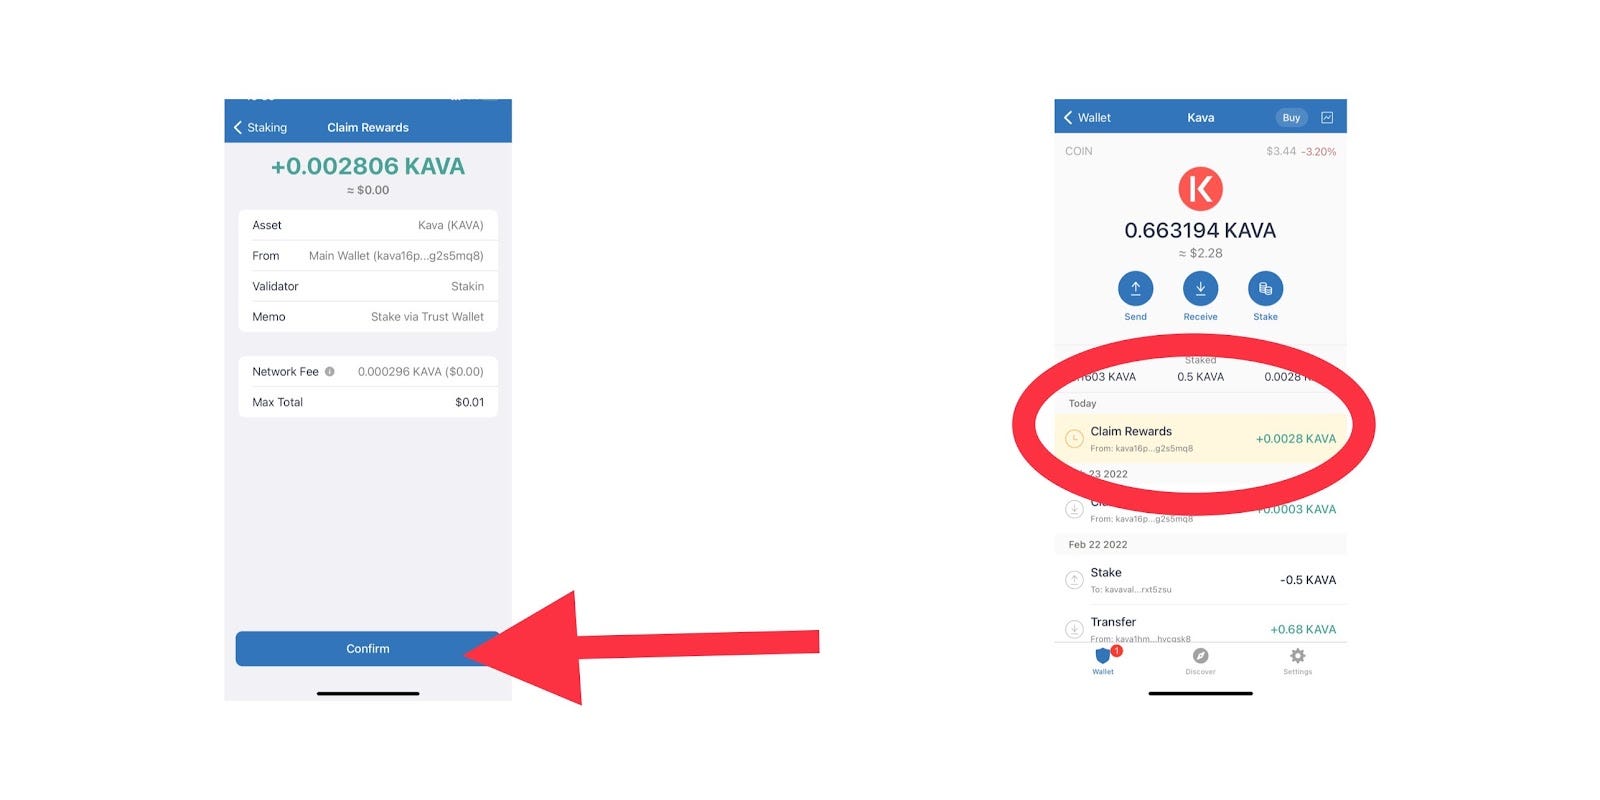
The accumulated rewards will show up in your total $KAVA on the dashboard. It’s possible to restake following the same process as mentioned above.
Staking $KAVA with Cosmostation
In this section, we’ll show you how to delegate your $KAVA tokens, how to claim and re-stake the rewards that you earn using Cosmostation.
First, let’s add KAVA to Cosmostation, steps are as follows:
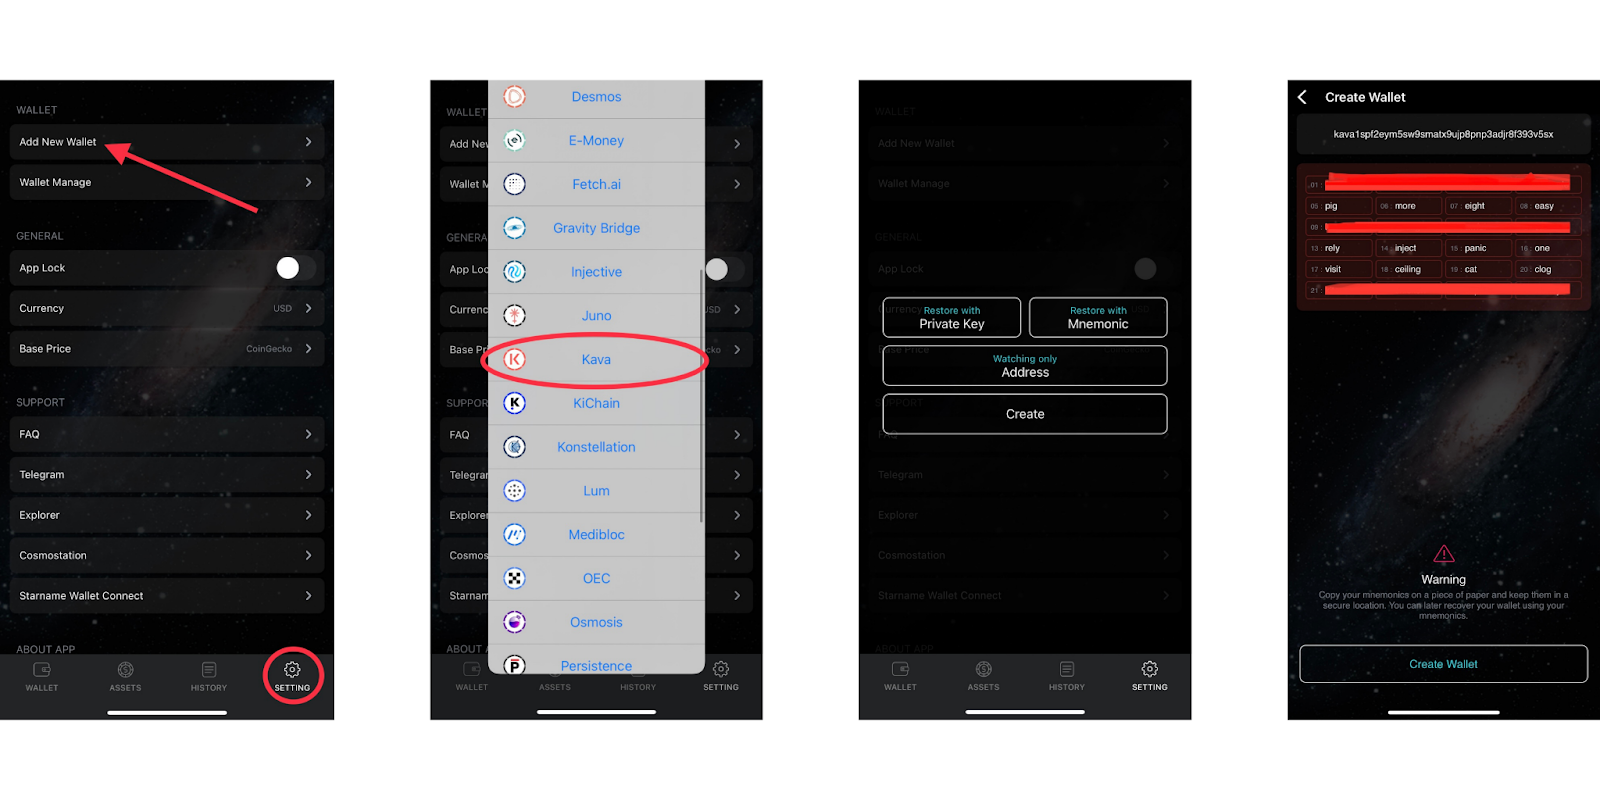
Head on to the settings tab and tap on “Add New Wallet” that’s the first option from the top to the bottom, then you’ll be asked what network you want to add, which will be KAVA in this case.
You can either create a new wallet, restore an existing one or just add a “watching only address” for this example, we choose to create a new wallet.
The next page is for you to write down your seed phrase, remember if you lose or someone else has access to this phrase, your funds will be lost forever (see picture below for step by step view).
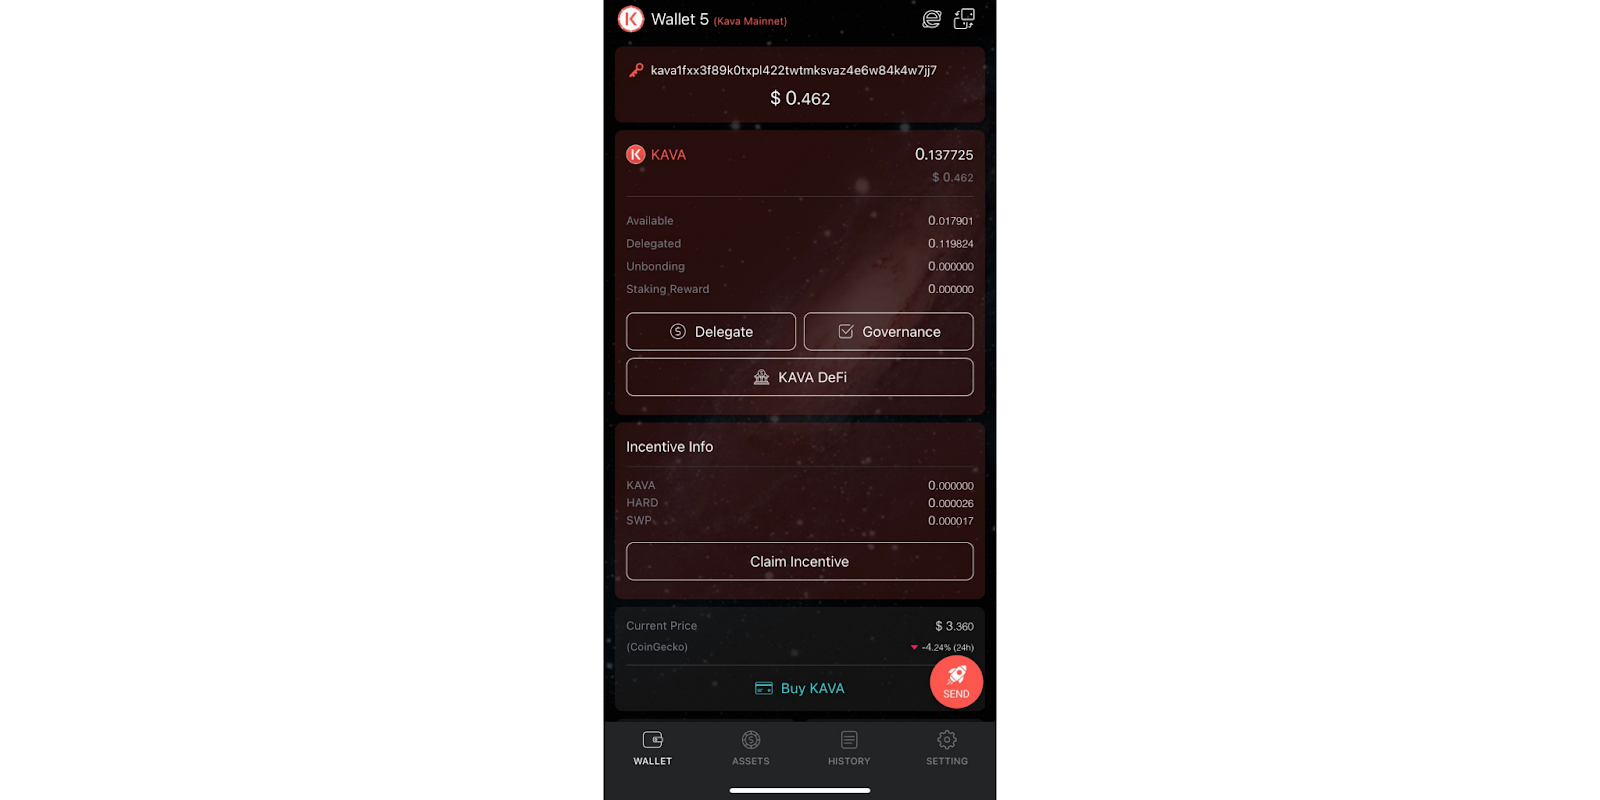
When you do these steps, your Kava wallet should look like this:
That’s it, you just created your Kava wallet on Cosmostation, now onto the fun part.
Delegating $KAVA With Cosmostation
When you open up the Cosmostation app, you are on the main page. Go to your Kava wallet, as shown below, and on the left-hand side, tap on “Delegate”.
The next page shows you the validator list, look for your preferred validator, in this case, we are using Stakin.
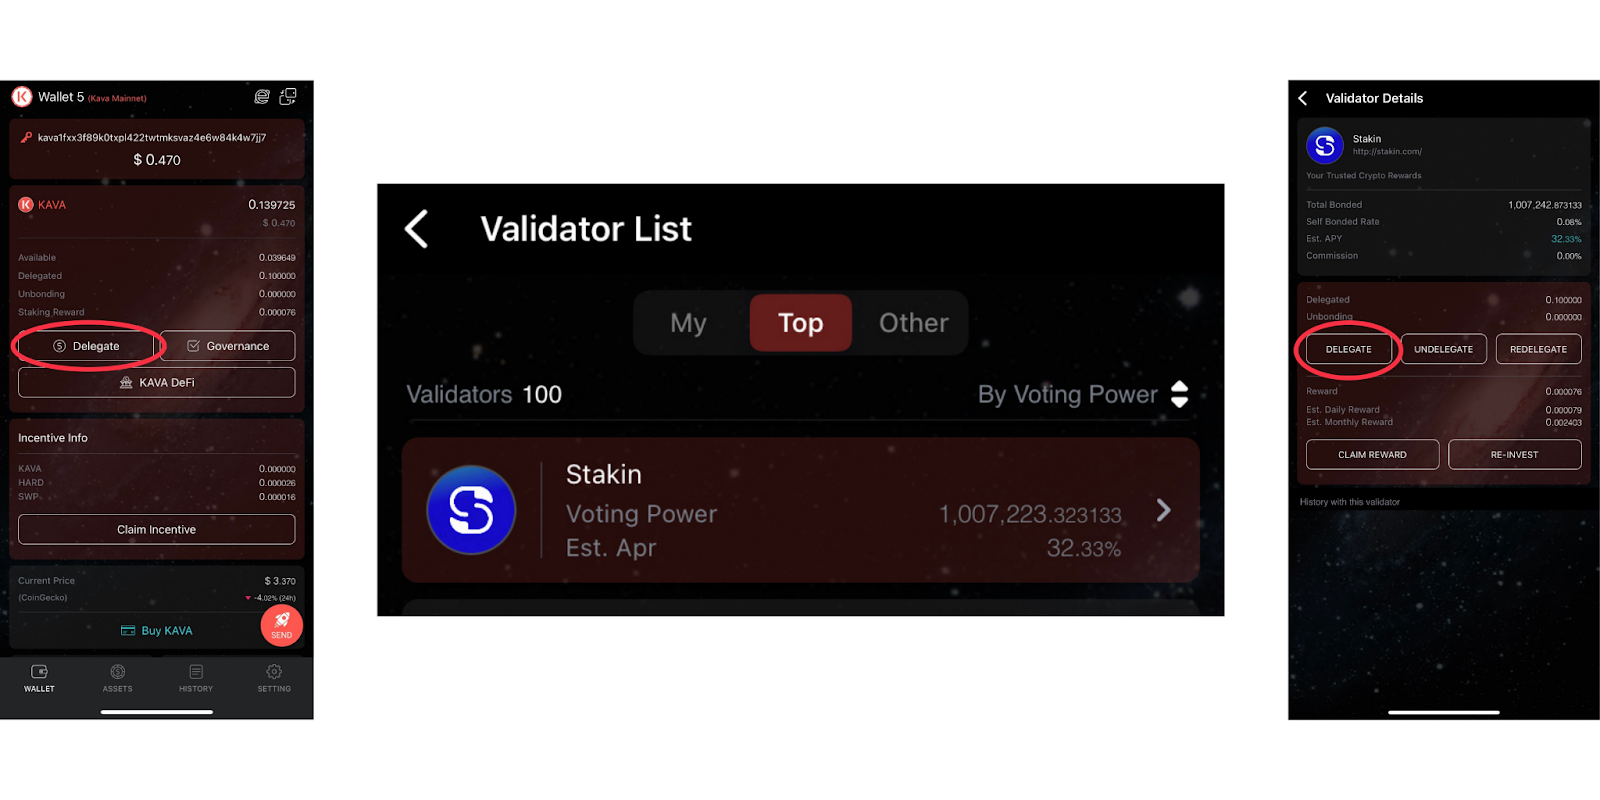
After you find your most preferred Validator to delegate your tokens to, go through the pages shown below.
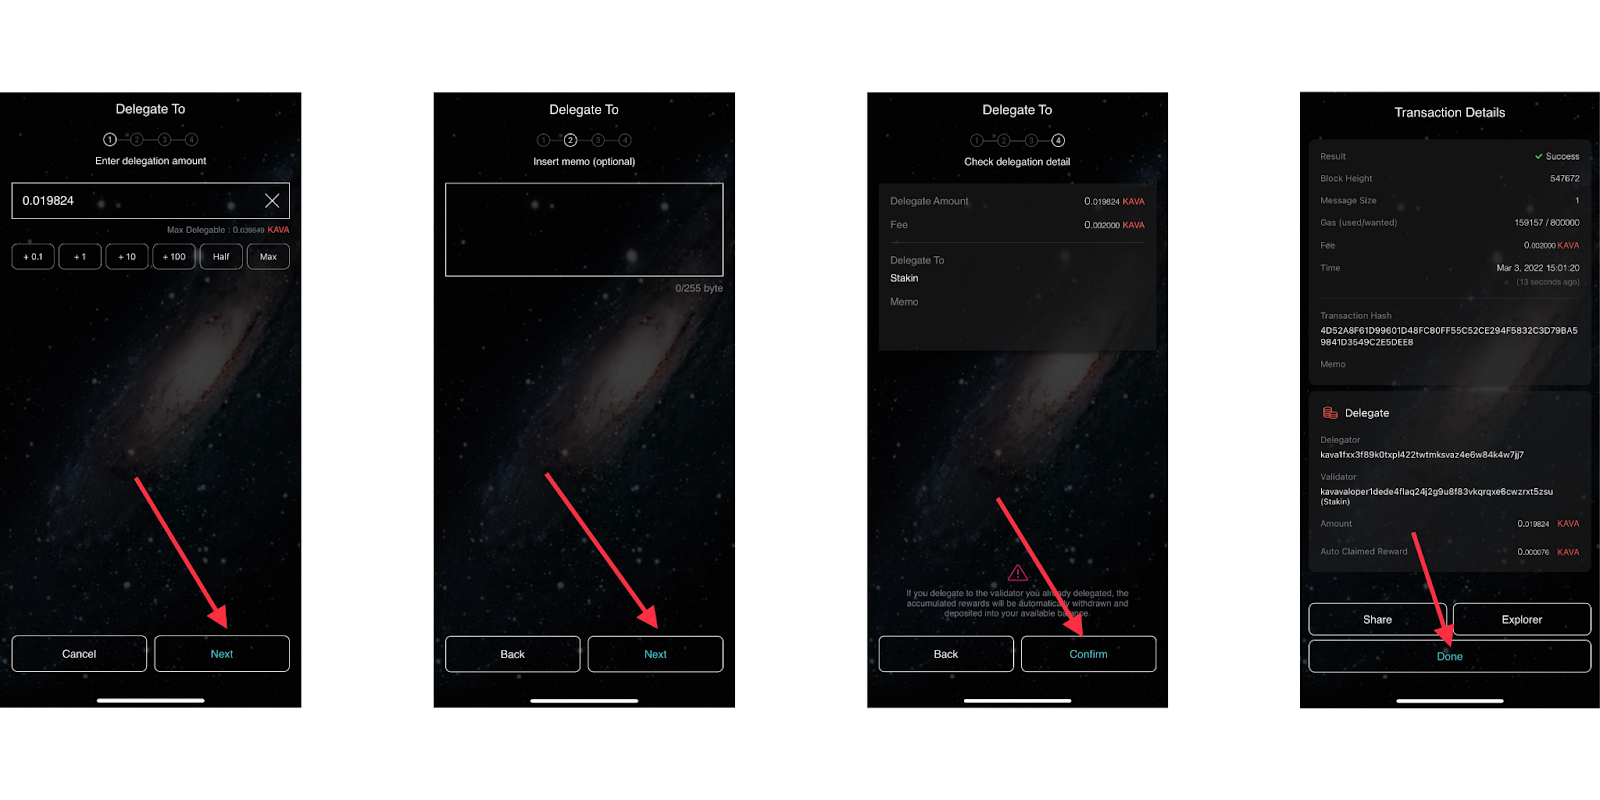
First, set the amount that you want to delegate, it has buttons to automatically use half or your max available balance, tap on “next” when you are done with that. Then it comes to the memo page, usually, a memo is required when sending funds to a custodial wallet, tap on “next” when you are ready. On the third page, which lets you select the fee, tap “next”. The last page shows you all the details about this transaction, tap “confirm” when you finish.
That’s how you delegate your Kava tokens using Cosmostation, now the next part is about claiming and re-staking your assets.
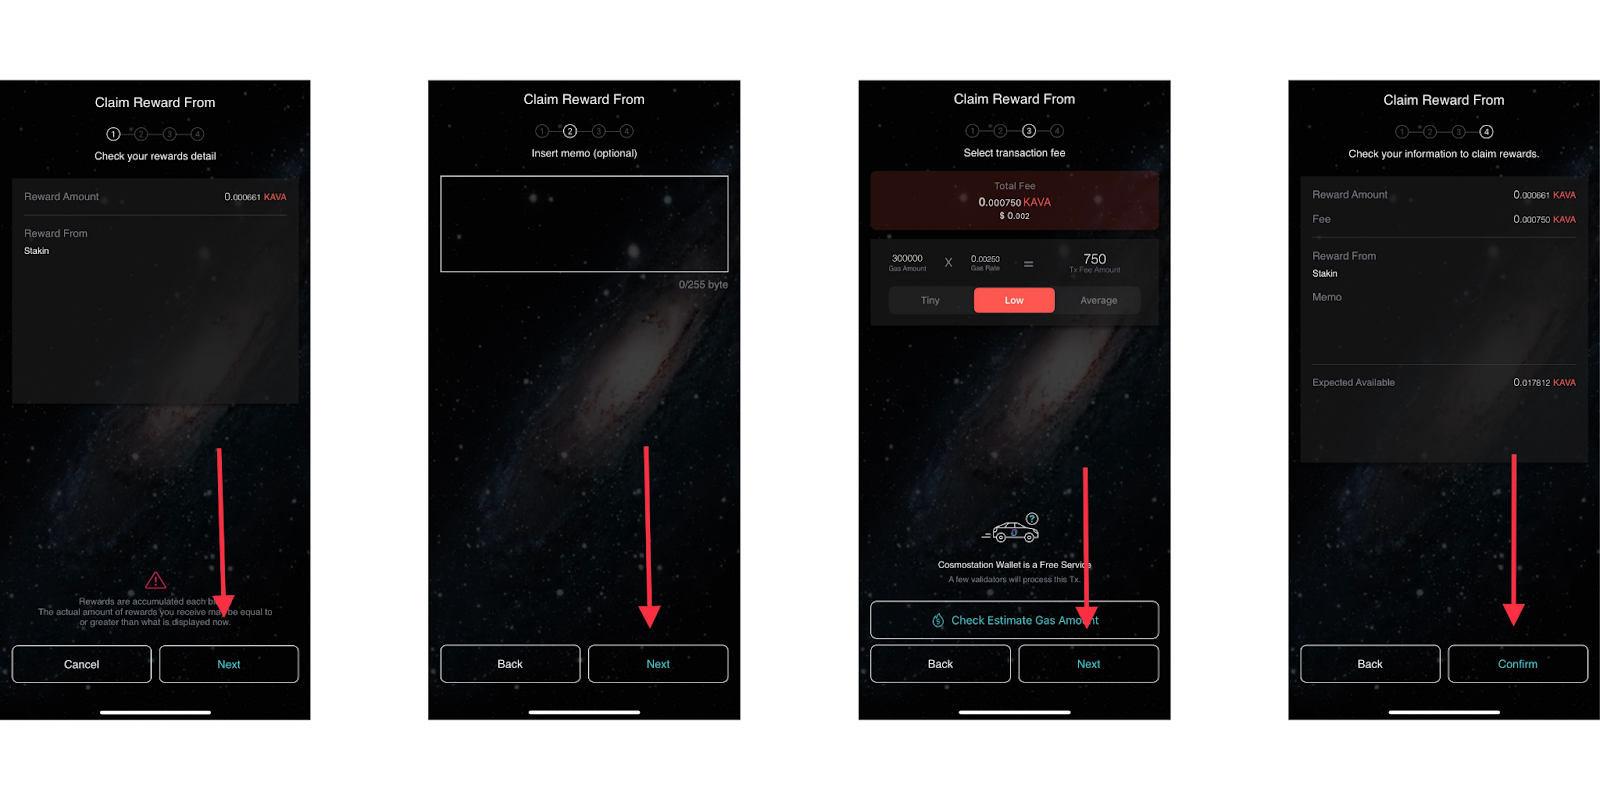
Claiming $KAVA with Cosmostation
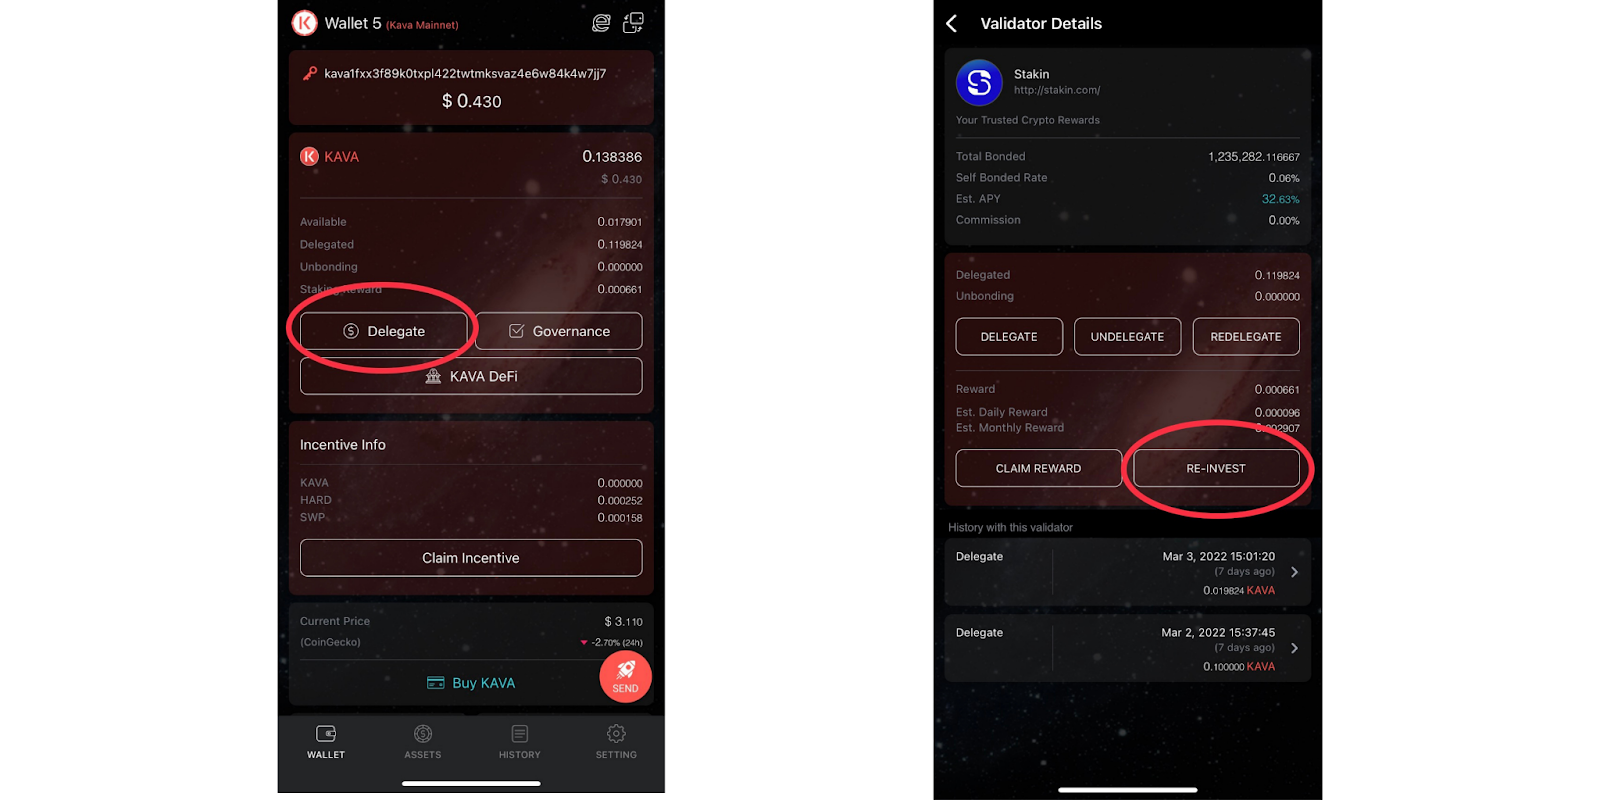
From the main screen, tap on “Delegate” which shows you various options: Delegate, undelegate, redelegate, claim the rewards, and reinvest.
First, click on “Claim reward” to go to the validator list page and tap on the validator of your liking.

After that, the first page you see is the Claim reward form, here you see the reward amount, tap “next” and it takes you to the Memo page, usually a memo is required when sending your crypto assets to a custodial wallet.
Tap “next” to set the fee for this transaction. Confirm all details, tap “next” and that’s all . Your rewards were just claimed. Great job!
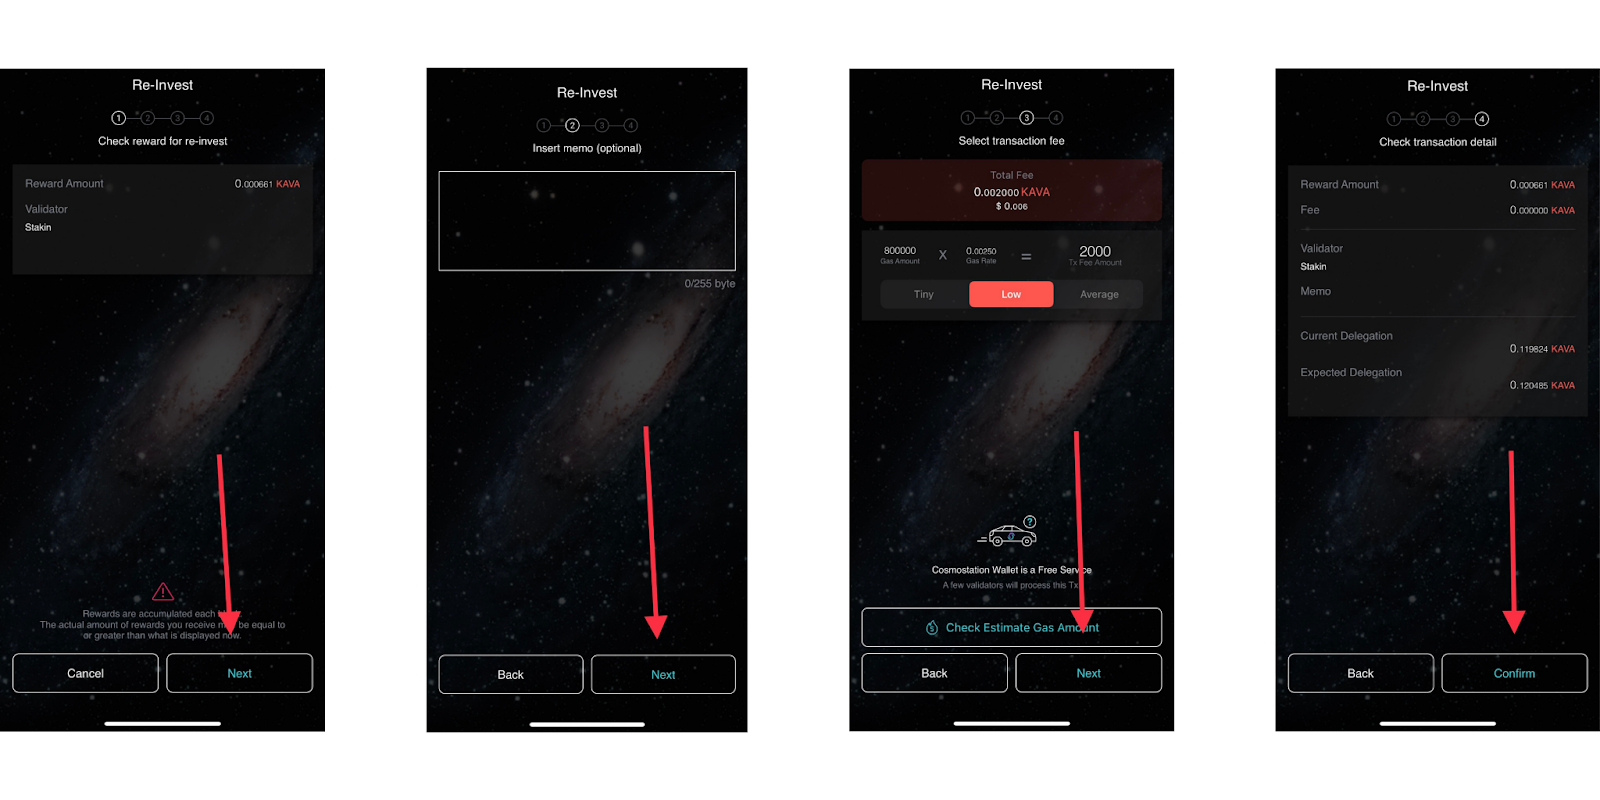
Re-stake $KAVA with Cosmostation
From the Kava wallet tab, tap on “delegate” followed by “reinvest” to, you guessed it, reinvest your rewards.
There are 4 pages with 4 different steps.
First page is to review your rewards, after reviewing, tap “next”, onto the memo page you can leave it empty and tap “next” again, third page is for the fees, select the fee of your choice and tap “next” again. The last page shows you the transaction details, confirm those and tap “Confirm”. (Steps shown in pictures below).
That’s all! You’ve now completed the staking process.
Stay connected with Kava network:
DISCLAIMER: This is not financial advice. Staking, delegation, and cryptocurrencies involve a high degree of risk, and there is always the possibility of loss, including the failure of all staked digital assets. Additionally, delegators are at risk of slashing in case of security or liveness faults on some protocols. We advise you to do your due diligence before choosing a validator.
Join the conversation