Learn how to create & restore a wallet, stake, vote, claim i-scores (rewards), transact, and use DApps with MyIconWallet! A wallet for ICON (ICX) and IRC2 tokens.
Heya fellow ICONists! 👋
The Reliant Node team recently released their MyIconWallet app to the public. Click here to download the app for Android & iOS.
Today, we’re going to explore and teach you how to utilize the said application.
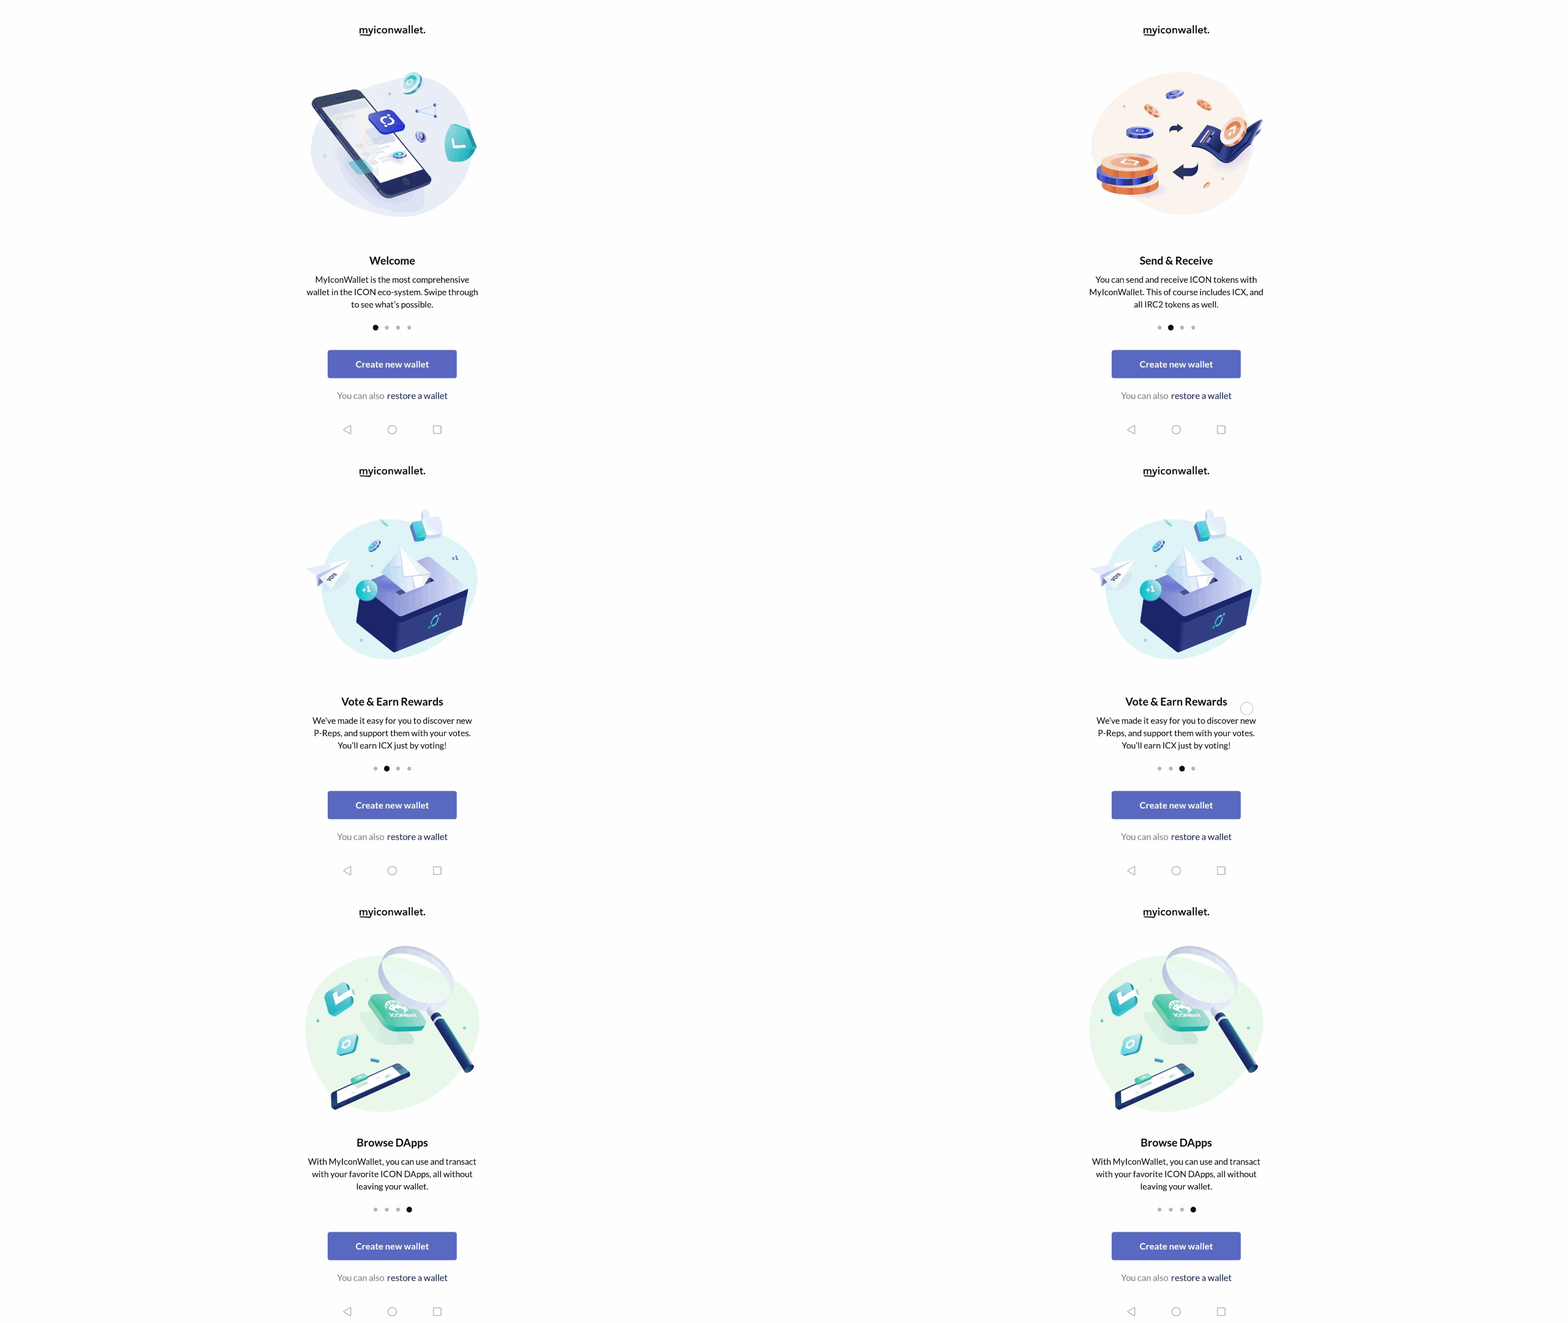
🤔What’s covered in this guide?
- Creating a wallet
- Restoring a wallet
- Staking and Voting
- Unstaking
- Claiming of i-scores (rewards)
- Reallocating/changing votes
- Sending ICX and IRC2 tokens
- Receiving ICX and IRC2 tokens
- Browsing and using the DApps
⚙️Creating a wallet
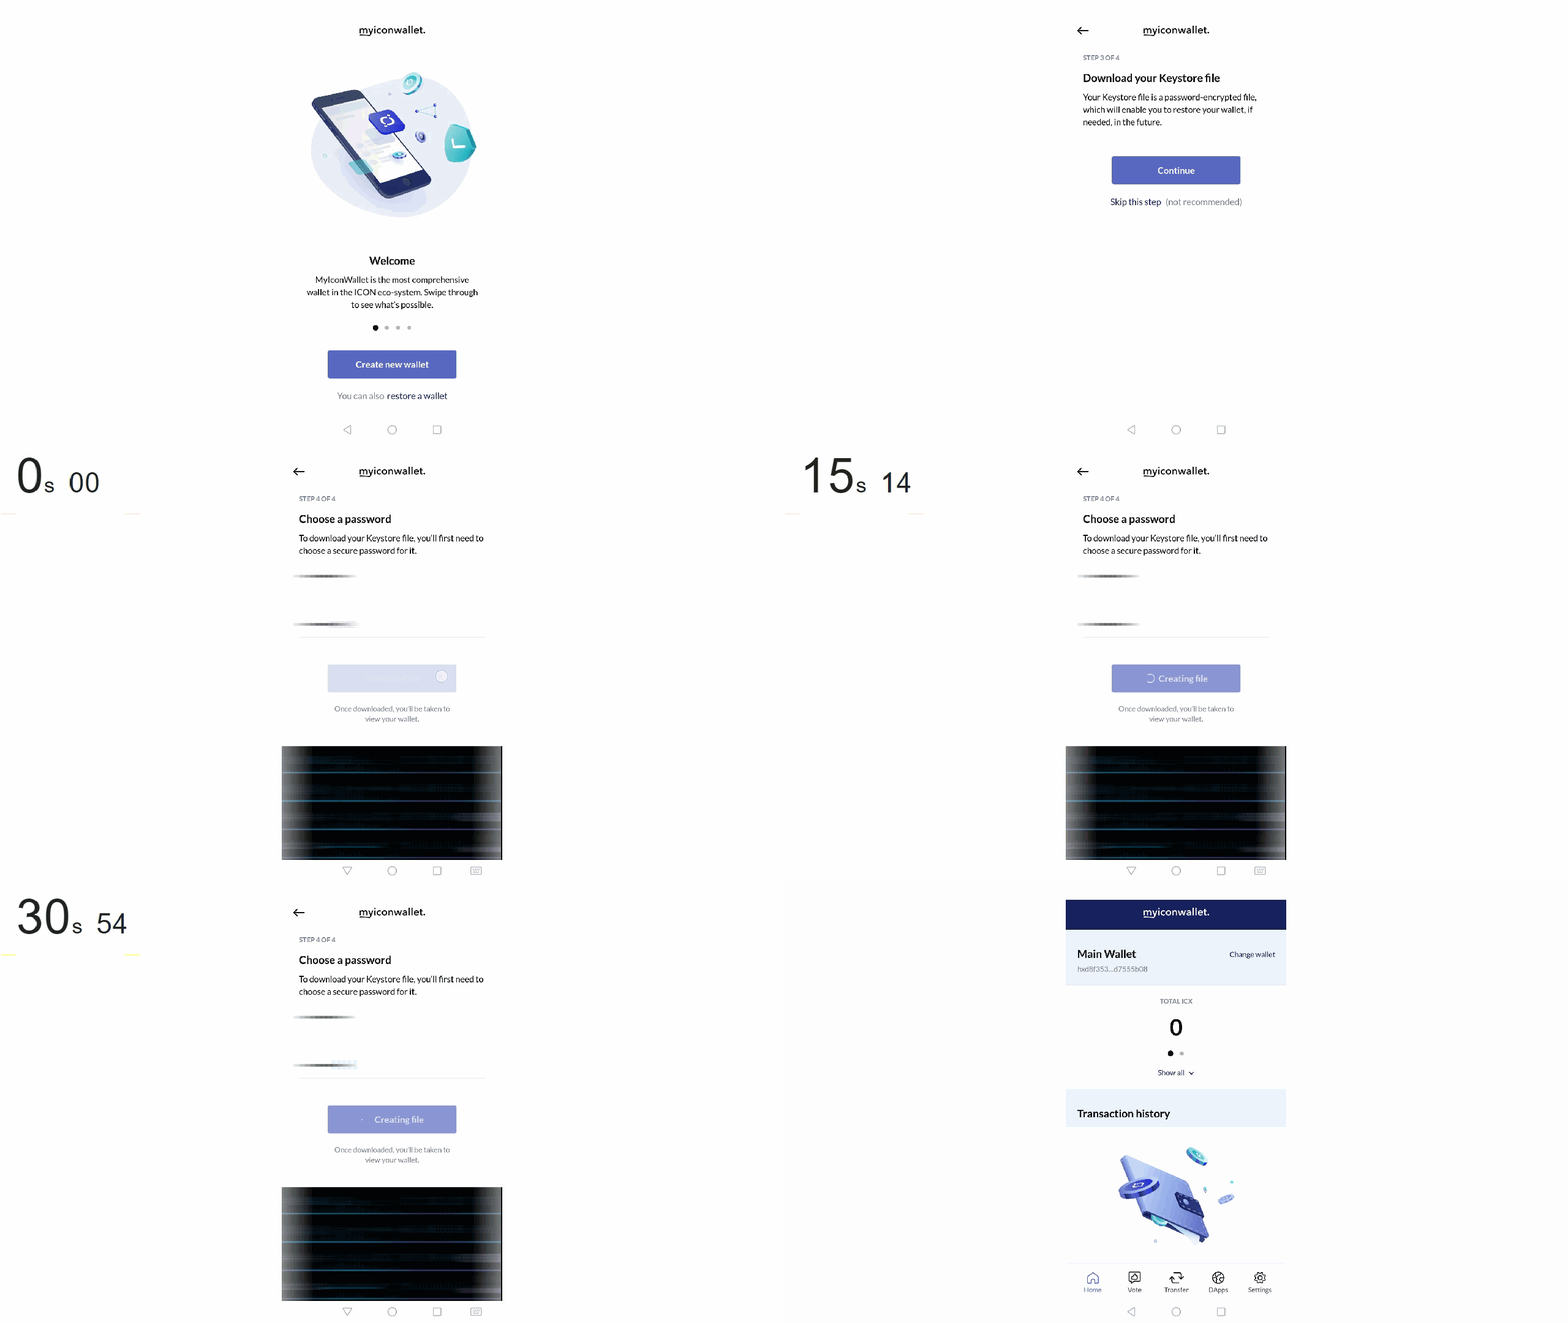
- Press “Create new wallet.”
- Enter your desired access code (6-digit pin).
Make sure it’s not easily guessable like your birthdate, favorite numbers, and etc. to make it more secure. You can store your pin in a password manager and/or write it down on a paper in case you forget it. - Input your access code again to confirm it.
- Enter the desired wallet name.
In this way, you can determine which wallet to use (ex: Main Wallet, Betting wallet, etc.) - Download your keystore file.
This is your backup file in case you forget your password. Thus, skipping this step is not recommended. You can restore it by choosing the “restore a wallet” on the first prompt (this is discussed in the next section). - Enter your password.
Make sure it is at least 8 characters long which includes at least: 1 uppercase letter, 1 lowercase letter, 1 number, and 1 special character. Again, make sure it’s not easily guessable. You can store your password in a password manager and/or write it down on a paper in case you forget it. - Press the “Download file” button.
If a prompt saying “Allow MyIconWallet to access photos, media, and files on your device” pops out, press the allow button. Based on the GIF above, it takes at least 37s to download the file. Your backup file will be automatically stored in your downloads folder. (Don’t worry about this permission, the app will only use this to retrieve and save the keystore file.)
📂Restoring a wallet
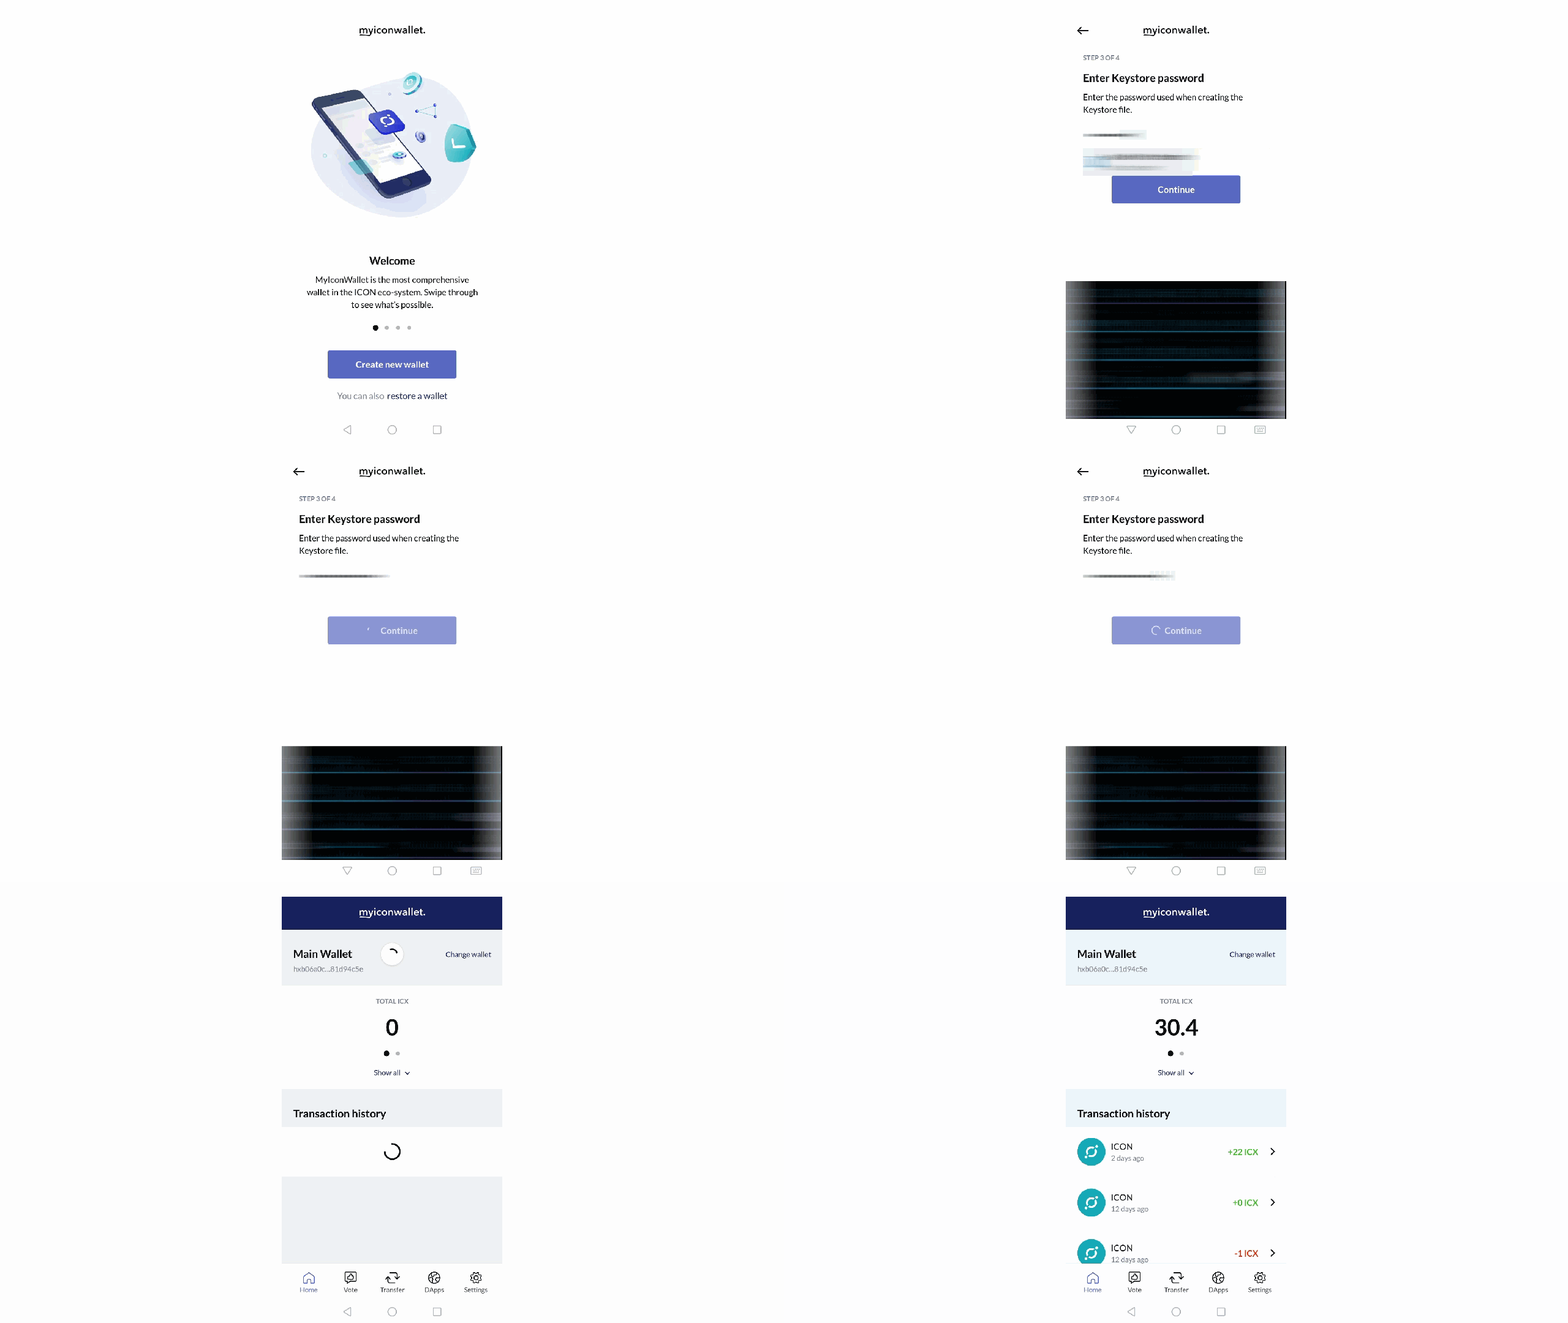
- Press “restore a wallet.”
- Enter your desired access code (6-digit pin).
Make sure it’s not easily guessable like your birthdate, favorite numbers, and etc. to make it more secure. You can store your pin in a password manager and/or write it down on a paper in case you forget it. - Input your access code again to confirm it.
- Press the “Choose your Keystore” button. Find and select the file you want to access.
- Enter the password that you have used in creating the keystore file.
- Enter the desired wallet name.
In this way, you can determine which wallet to use (ex: Main Wallet, Betting wallet, etc.)
✅Staking and Voting
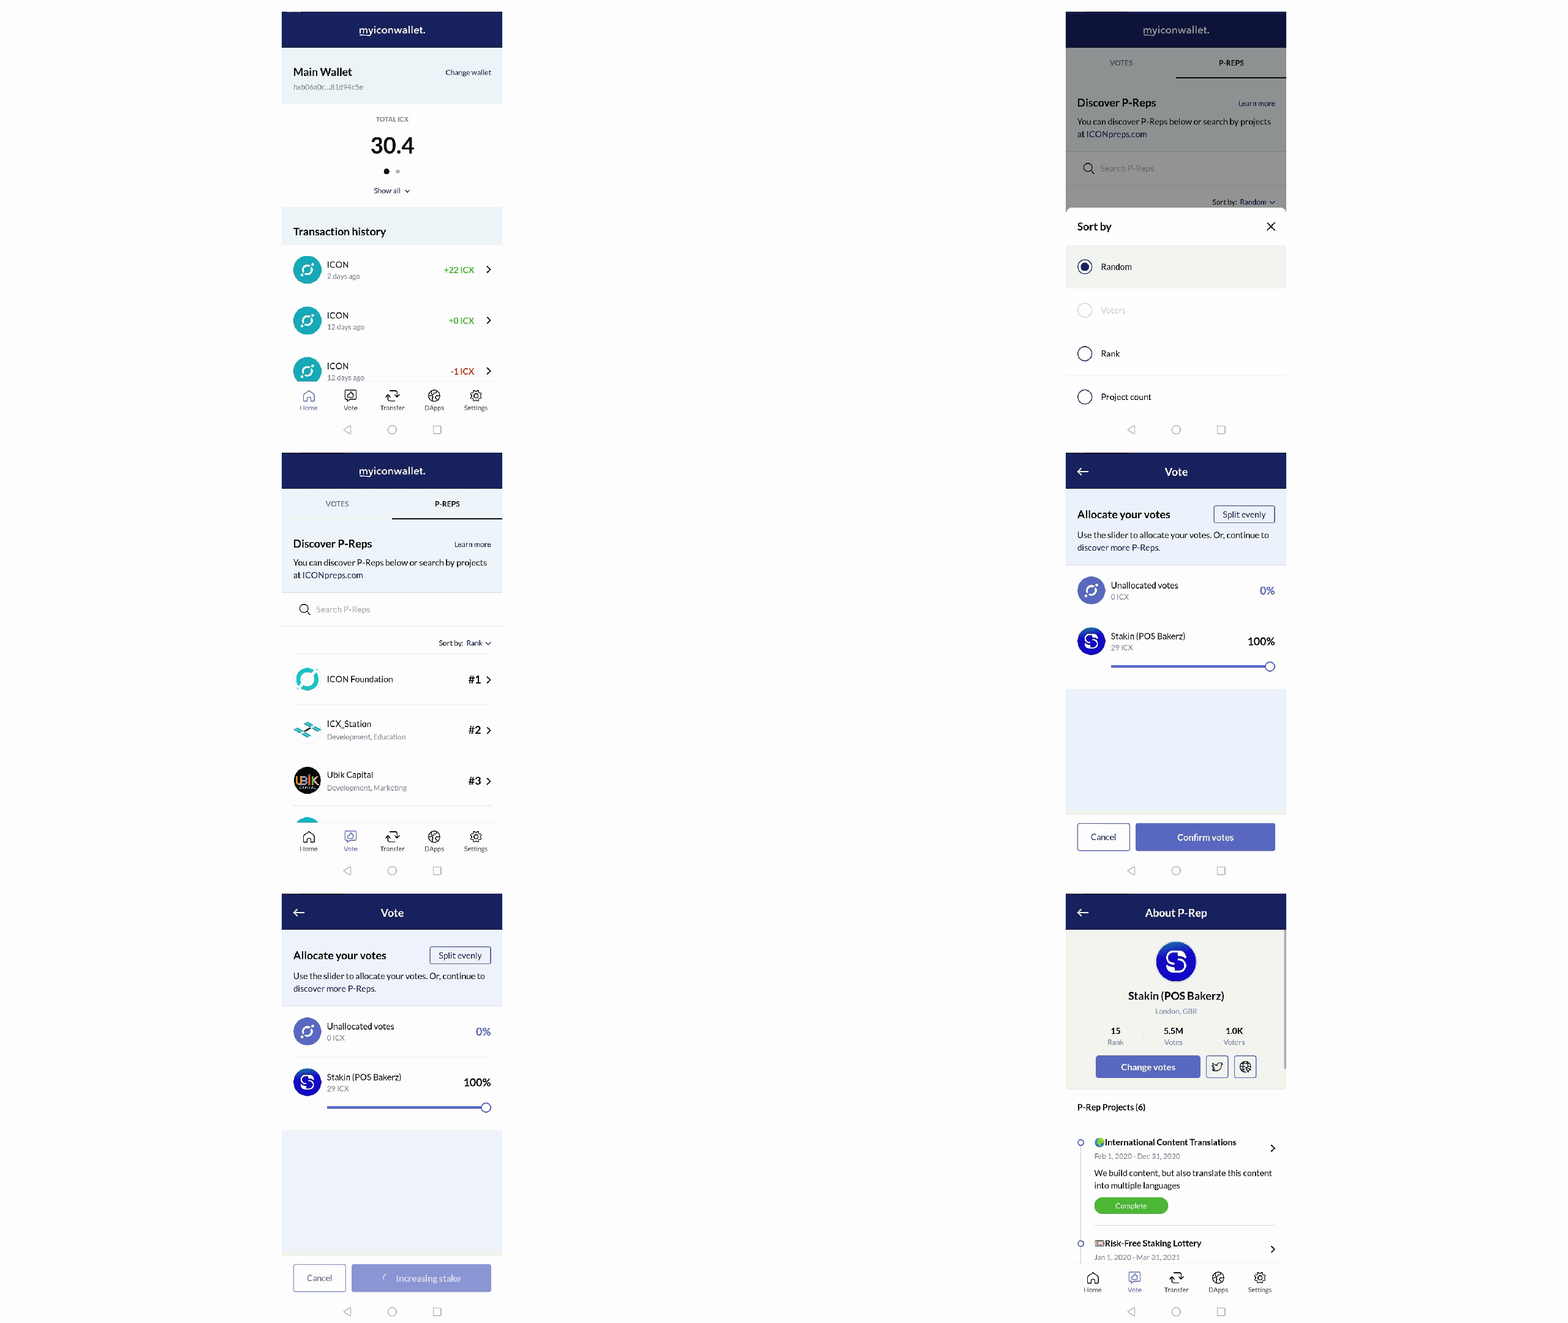
- Press the “Vote” button.
There is no “Staking” button since the application automatically stakes your ICX tokens to vote. Useful, right!? - Choose the P-rep you want to vote for.
The P-reps list are randomized at first. You can sort the list by pressing the “Sort by” dropdown and choose to display by: Random, Voters, Rank, and Project count. You can use the search bar and type Stakin to vote for us ❤ - Press the “Vote” button on the page of the P-rep.
- Drag the slider from left to right to allocate votes.
You can choose to split evenly (if you chose multiple P-reps and/or adjust to your desired amount). - Press the “Confirm votes” button.
A prompt will show up saying you are about to increase your staked ICX. A description regarding the unstaking procedure is also stated (as discussed in the unstaking section of this guide). Press the button again. A prompt will pop up saying “Your votes have been allocated.” this means you have successfully staked and voted!
🔓Unstaking
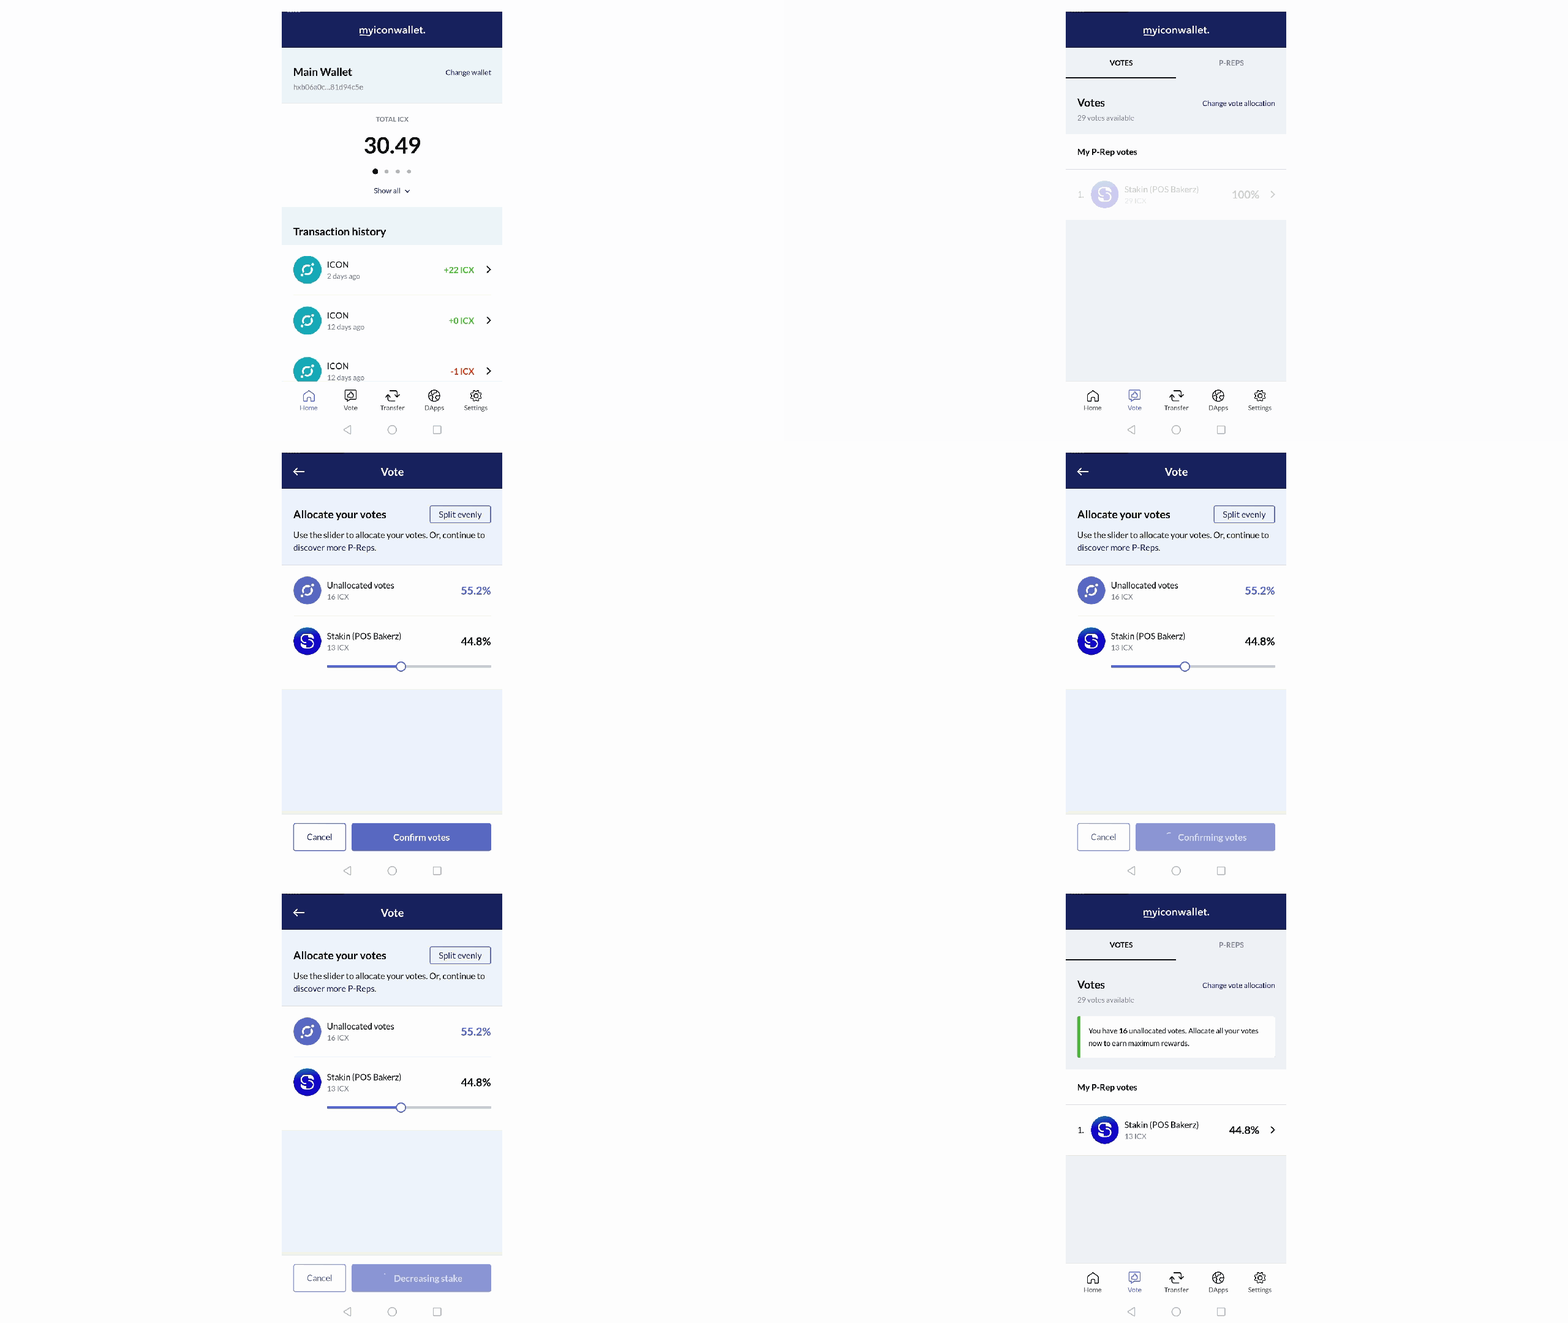
- Press the “Vote” button.
- In the “Votes” tab, press the P-rep you want to unstake with.
- Move the slider from right to left to decrease the allocated votes.
- Press the “Confirm votes” button.
A prompt will show up saying you are about to decrease your staked ICX. Please take note that you don’t get rewards during the unstaking period. If you adjust or submit another unstaking transaction, the whole unstaking period will reset. Press the “Confirm votes” button again to unstake your ICX. - Wait for a couple of seconds until a prompt will pop up saying “Your votes have been allocated.”
Please wait for a couple of days for your ICX to be fully unstaked.
💰Claiming of i-scores (rewards)

- After staking & voting, it will take 2 terms (~48 hours) for your rewards to appear. After that, you will receive your rewards every term (~24 hours/daily).
- In the “Home” tab, press “Claim I-score”
A prompt will appear the will indicate how much I-scores you currently have and the equivalent in ICX. Please take note that 1,000 I-scores are proportionate to 1 ICX. - Press the “Continue” button and a green prompt will appear saying “Your I-score has been claimed.”
🔄Reallocating/changing votes
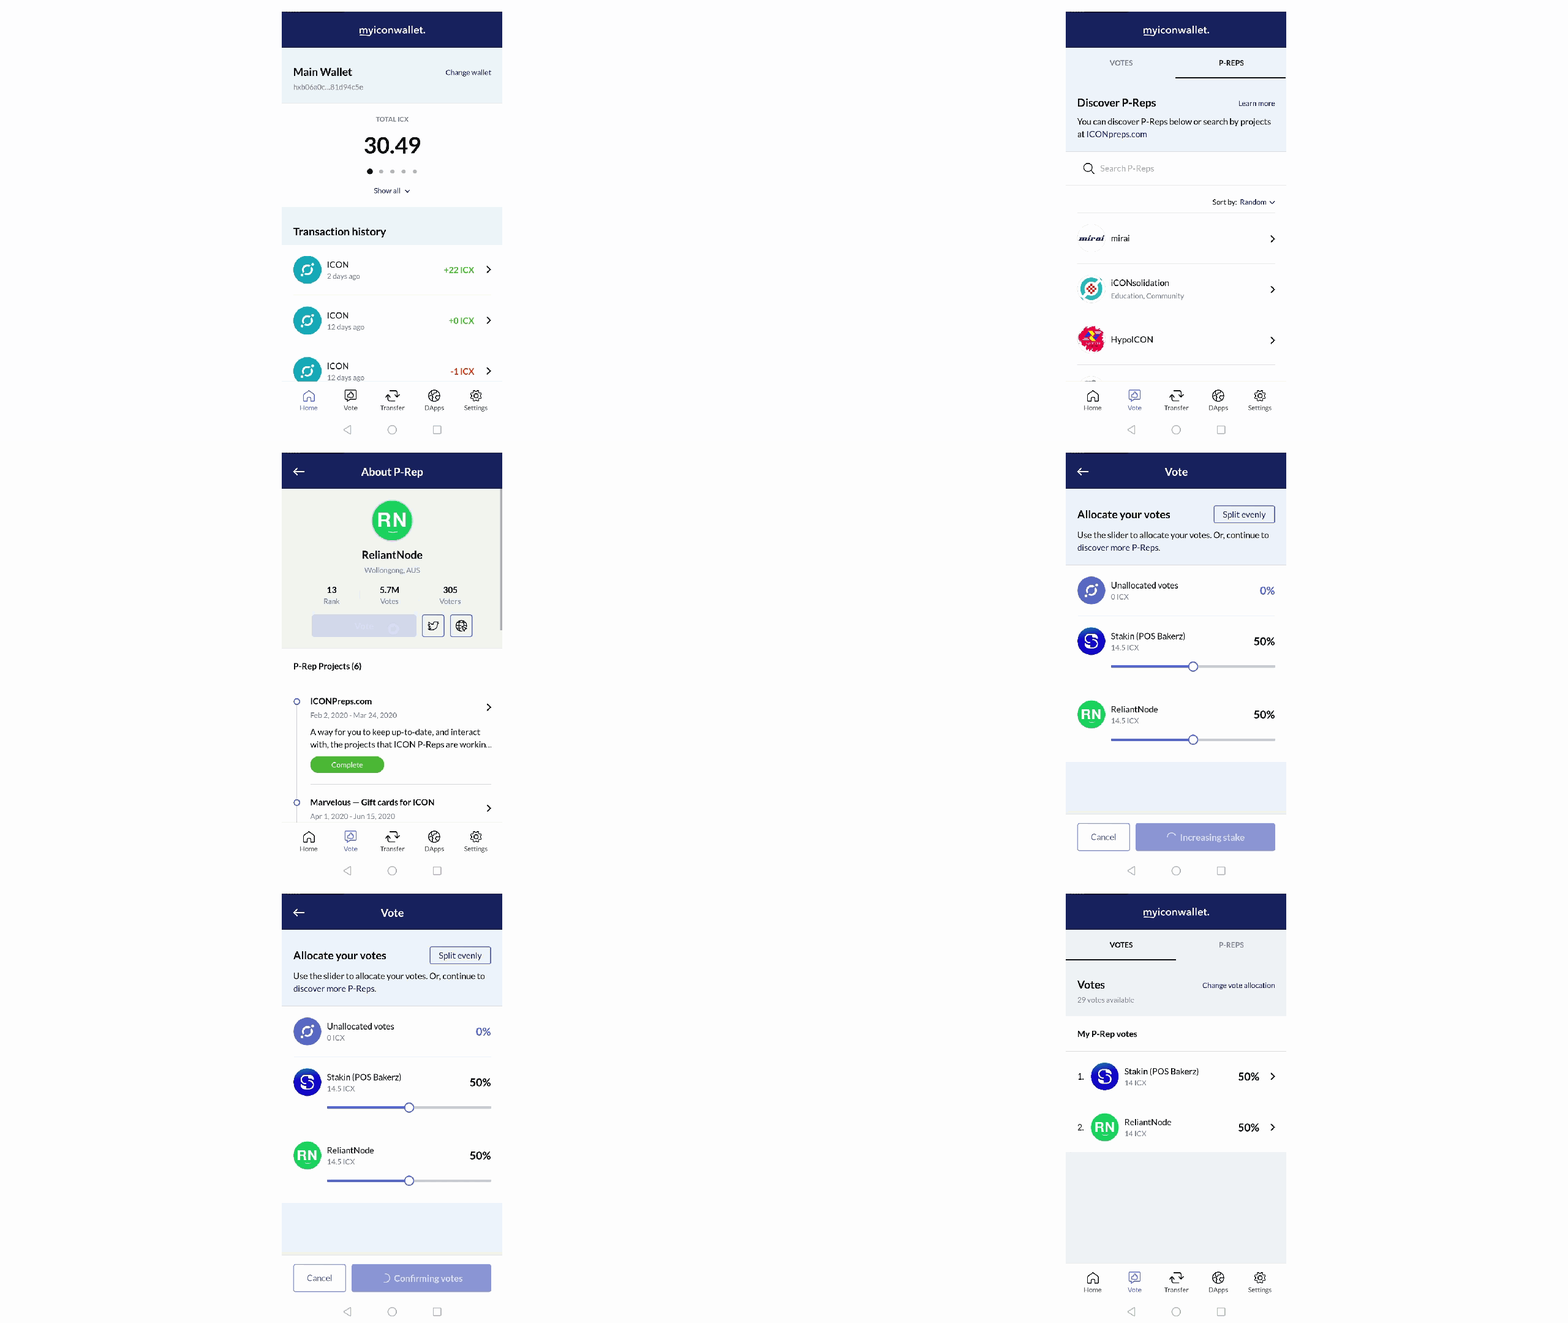
- Press the “Vote” button.
- Select or find the P-rep you want to vote for.
- Press the “Vote” button on the page of the P-rep.
- Drag the slider from left to right to allocate votes.
You can choose to split evenly (if you chose multiple P-reps and/or adjust to your desired amount). - Press the “Confirm votes” button.
A prompt will show up saying you are about to increase your staked ICX. A description regarding the unstaking procedure is also stated (as discussed in the unstaking section of this guide). Press the button again. A prompt will pop up saying “Your votes have been allocated.” this means you have successfully reallocated/changed!
⬆️Sending ICX and IRC2 tokens
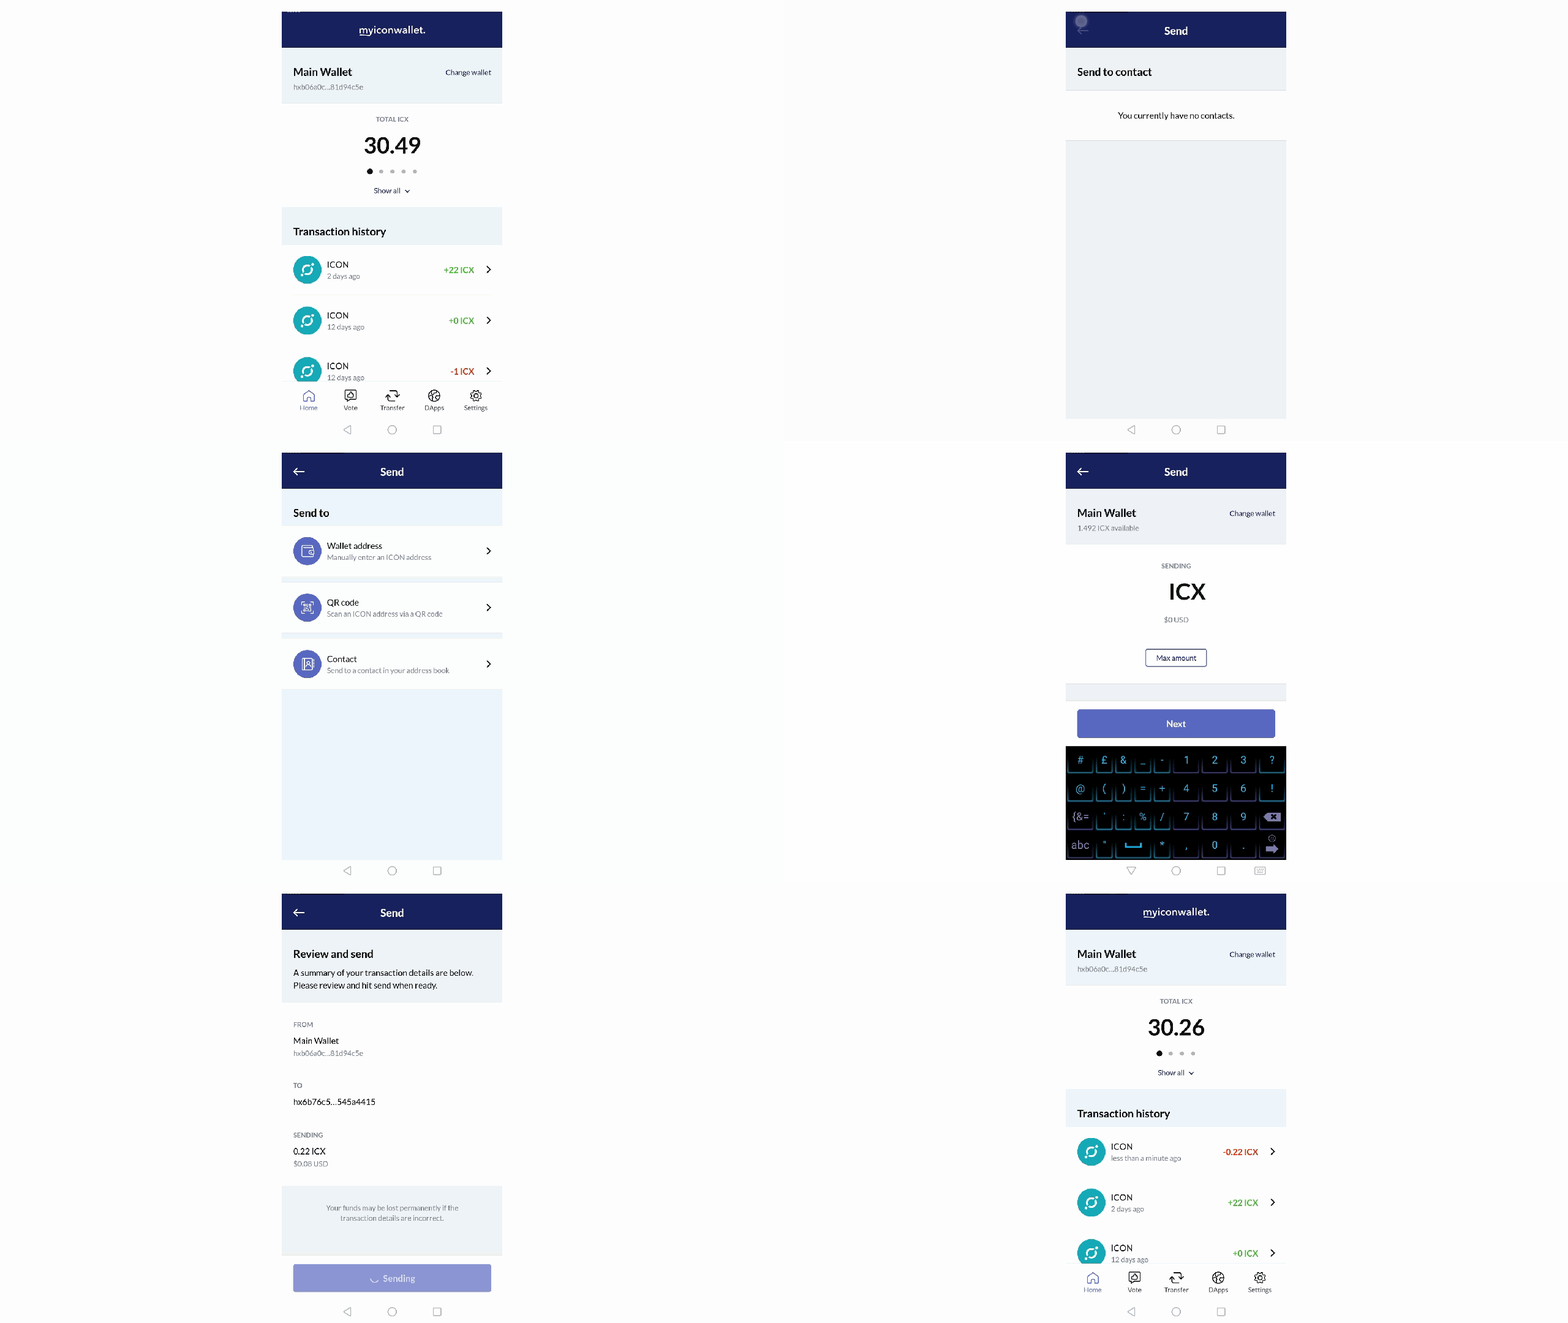
- Press the “Transfer” button.
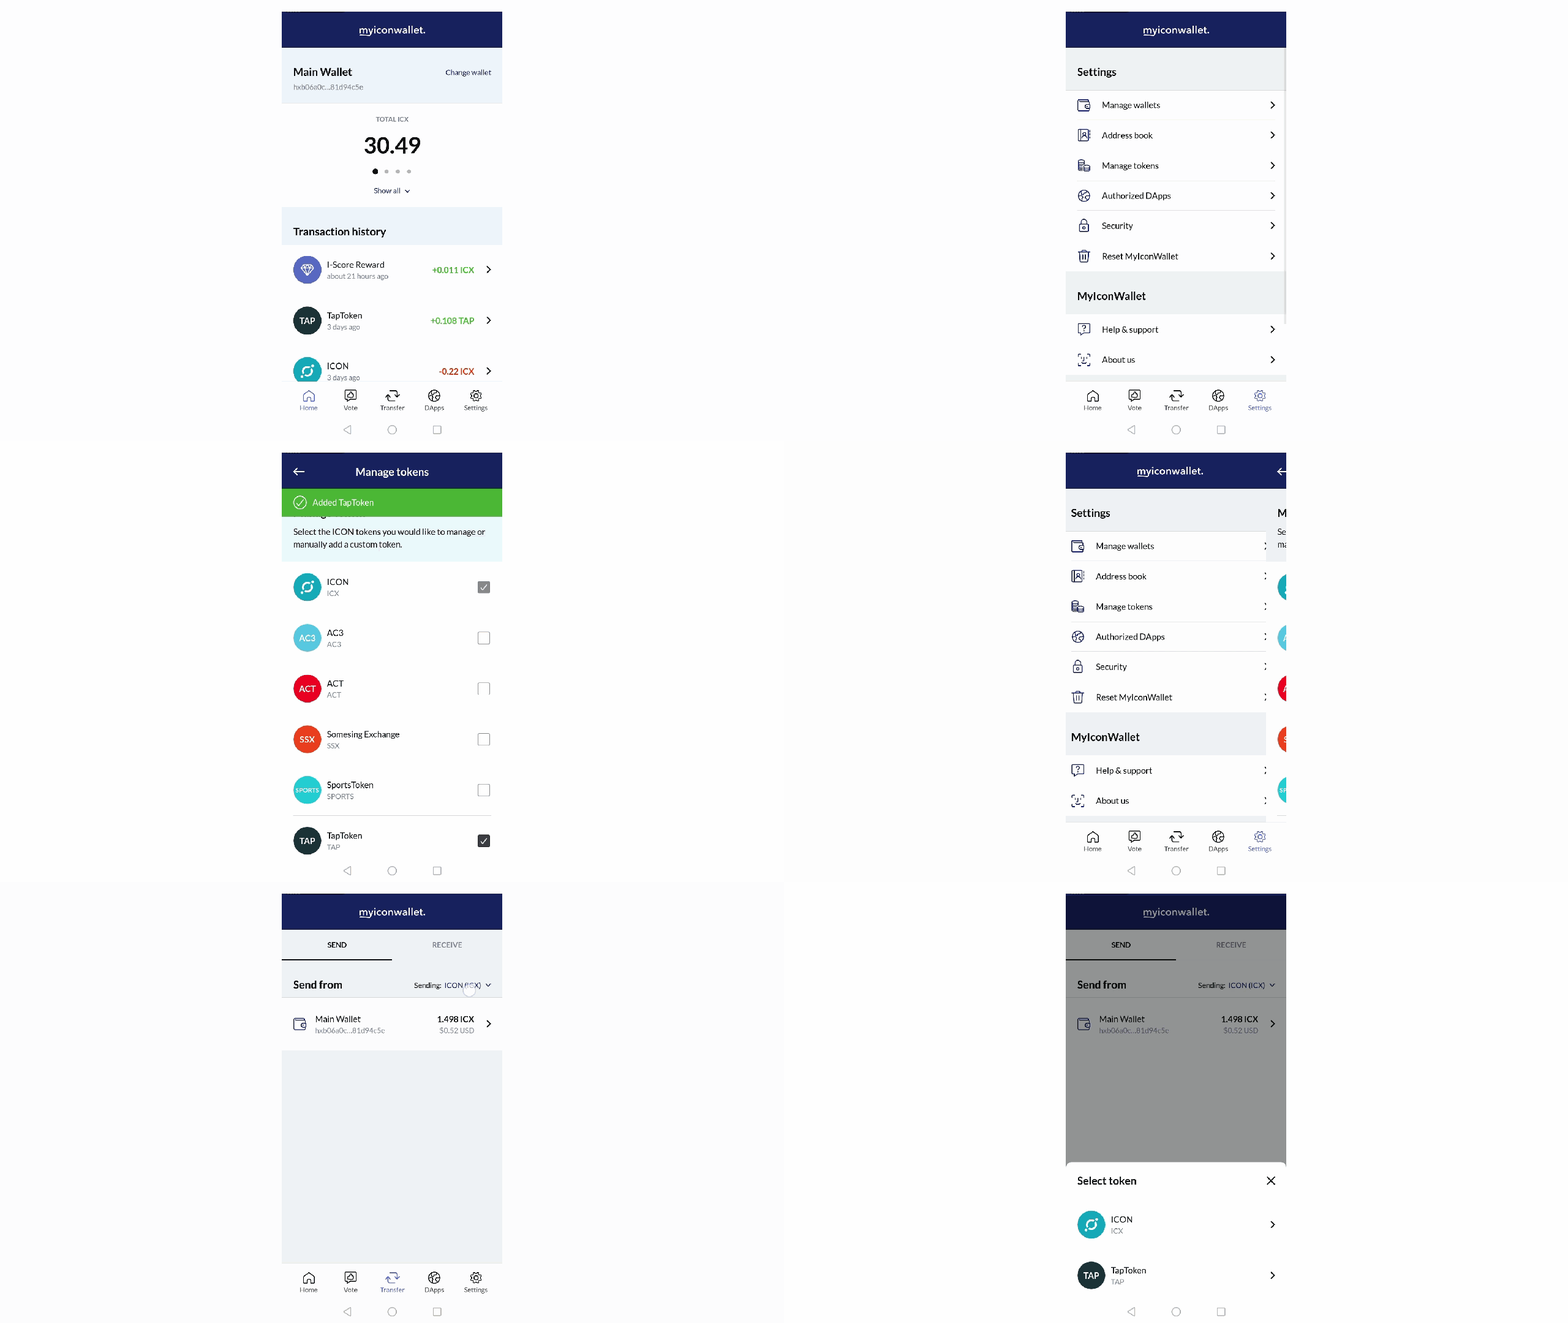
- Select the “Send” tab and choose the wallet you want to be debited.
- If you want to send ICX, make sure the “Sending” portion says ICON (ICX).
You can select the drop-down list and choose the token you want to send. To send tokens, go to “Settings” and select “Manage tokens.” Press the token you want to enable, a prompt will pop up saying “Added” then the token name (GIF demonstration below).
4. Choose from the 3 options presented.
Manually entering the wallet address is not recommended, it takes time and in a worst-case scenario, a typo can be entered. In the GIF presented, we selected the “QR code” option since it’s the easiest way. If you saved someone’s address before, you can select the “Contact” method.
5. Enter the amount of ICX or token that you want to send to the recipient and select next.
6. Review carefully the details. Once it is sent, it is irreversible. Press send after double-checking.
A prompt will pop up saying “Your transaction has been sent” this means you have successfully sent your ICX or token to the recipient!
⬇️Receiving ICX and IRC2 tokens
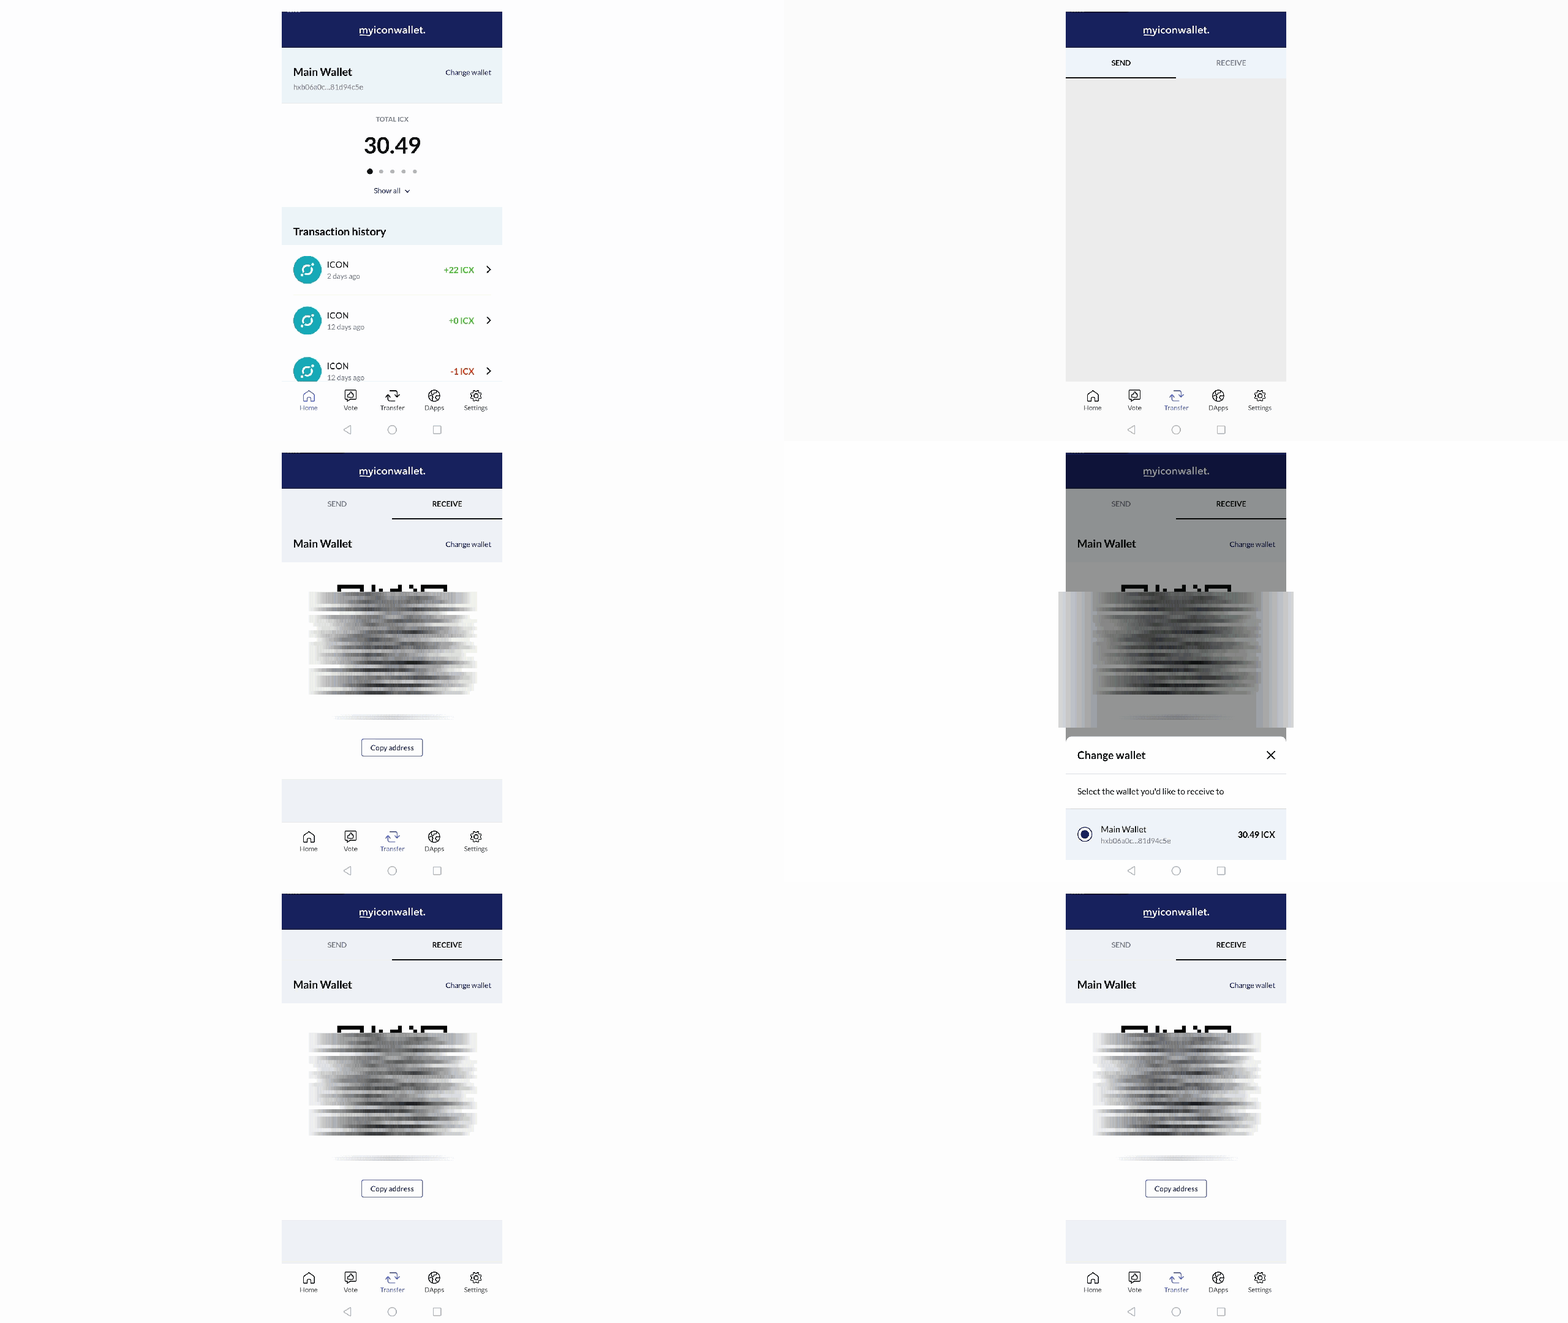
- Press the “Transfer” button.
- Select the “Receive” tab and choose the wallet you want to be credited.
- A QR code will be displayed based on the wallet you have selected.
You can take a screenshot and give it to the sender so that he/she can easily send you ICX or IRC2 tokens. Also, you can press the “Copy address” button if you want to give your full wallet address in a plain text.
🎲Browsing and using the DApps
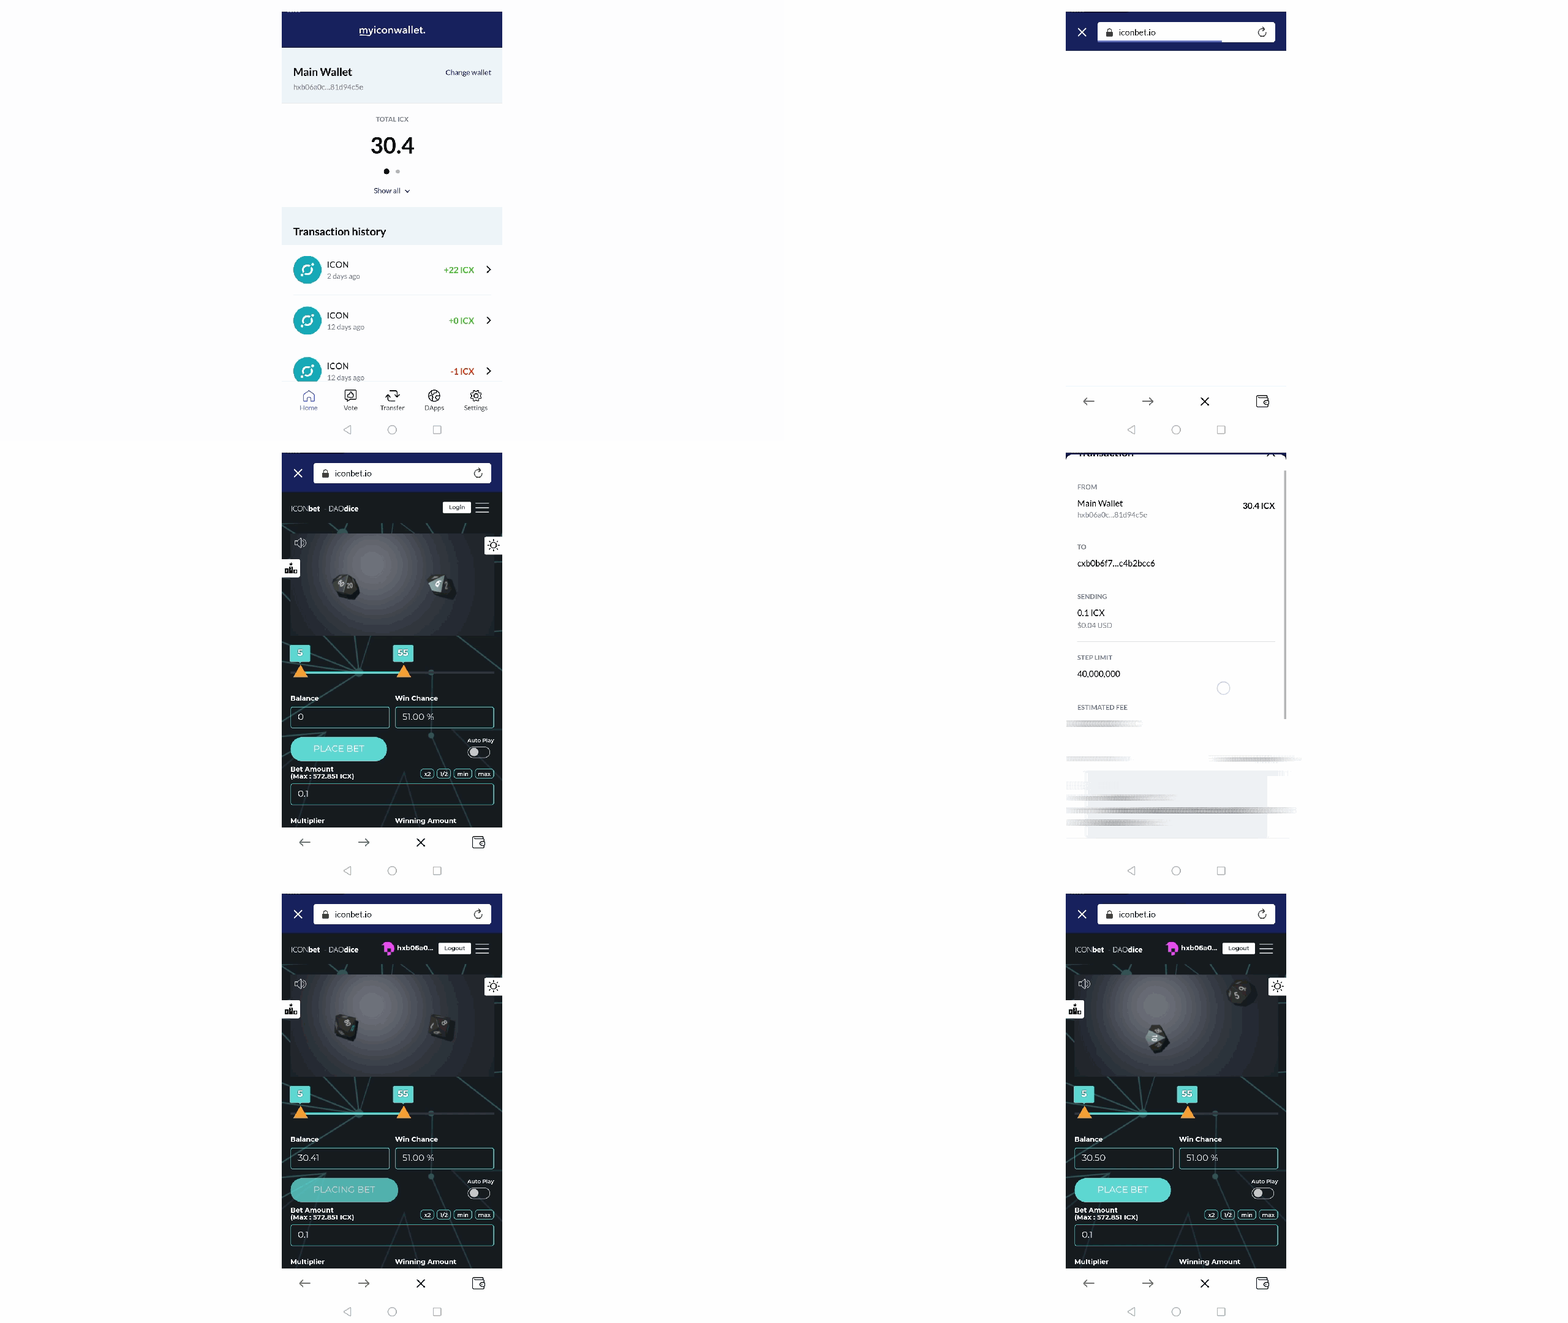
- Press the “DApps” button.
- Enter the URL or you can find and select the DApp you want to interact within the given list.
- Authorize the DApp to connect to your wallet.
You will still be asked to confirm the transactions, so there’s nothing to worry. - To change the wallet to use in interacting with the specified DApp, press the wallet icon in the bottom right (near the X icon).
A special thank you to the Reliant Node ICON P-rep team! The UI looks great and the user experience is very smooth. In my opinion, this is a great alternative to the ICONex app. Great job!
Stakin (POS Bakerz) is one of the P-reps! Please support us. 🙌
We are an infrastructure operator for Proof-of-Stake (PoS) public blockchains, offering public delegation services and staking-as-a-service on major PoS protocols.
Get to know more about ICON!
- Stakin P-Rep Proposal
- ICON Website
- ICON Tracker
- ICON Github
- ICON Official Telegram Channel
- ICON Non-Official European Community Telegram
- Stakin Medium on ICON
- Daily updates about ICON
- Stakin’s Twitter
- Stakin’s Facebook
- Stakin’s Telegram Channel
DISCLAIMER: This is not financial advice. Staking and cryptocurrencies investment involves a high degree of risk, and there is always the possibility of loss, including the loss of all staked digital assets. Additionally, delegators are at risk of slashing in case of security or liveness faults on some PoS protocols. We advise you to DYOR before choosing a validator.


Join the conversation