

A short guide explaining how developers can get started deploying DeFi Dapps such as ThorChain BEPSwap on Akash Decentralized Cloud.
This guide was originally published on Github Awesome Akash repo. It is based on the guidelines provided by Serum on Akash. If you’re not familiar with Decentralized Cloud (DeCloud) and Akash, I recommend you take a look at my past article: Why DeCloud is important for DeFi. DeCloud is a blockchain-based alternative to traditional cloud providers which brings several advantages and competitive pricing. It’s also quite easy to get started, and that’s what we will see here.
In this article, you will see how to deploy ThorChain BEPSwap web UI using Akash. Many more Dapps can be easily deployed on Akash, as you can see in the Awesome Akash repo. I chose to build a guide with ThorChain BEPSwap because I am a big fan of their cross-chain liquidity network, and it’s built on Cosmos, just like Akash. It’s worth exploring more about ThorChain if you’ve not done so yet.
This guide is divided into 8 steps. You can skip step 4 if you want to re-use my Docker image. Do not forget to close your deployment if you are running on testnet, as resources are limited, see Step 8 on how to close.
- Prerequisites
- Set-up your environment
- Verify your environment
- Build Thorchain BEPSwap UI container
- Create the deployment
- Deploy
- Service logs
- Close your deployment
1. Prerequisites
You will need some basic command line and Linux knowledge to go through the guide. Please set-up the below before going further:
- Install Akash
- Choose an Akash network to connect to. This guide will be using edgenet testnet.
- Create or import a wallet
- Fund your account
If you intend to containerize your own web app (Step 4):
2. Set up your Environment
We will be using shell variables throughout this guide. Ensure you have the below variables set-up by using export VARNAME=…
AKASH_NET=... See latest Akash network doc to choose your network. We will be using edgenet with:
export AKASH_NET="https://raw.githubusercontent.com/ovrclk/net/master/edgenet"AKASH_CHAIN_ID=... We will be using edgenet-1 which is the recommended edgenet chain at the time of this article.
export AKASH_CHAIN_ID="$(curl -s "$AKASH_NET/chain-id.txt")"AKASH_NODE=… We will be using a recommended RPC endpoint based on the chosen Akash network .
export AKASH_NODE="$(curl -s "$AKASH_NET/rpc-nodes.txt" | shuf -n 1)"KEY_NAME=yourkeyname for example:
export KEY_NAME=edouardACCOUNT_ADDRESS=… We will be getting the account address based on the key.
export ACCOUNT_ADDRESS="$(akash keys show $KEY_NAME -a)"3. Verify your Environment
We will now verify that we have set-up the environment correctly and that we are ready to move forward.
Verify that you have the correct node and chain id.
echo $AKASH_NODE $AKASH_CHAIN_IDthis should return something similar to. These values might differ depending on the network to which you are connecting
tcp://rpc-edgenet.akashdev.net:26657 akash-edgenet-1Verify key name
echo $KEY_NAMEmy local key is called edouard
edouardVerify the account address
echo $ACCOUNT_ADDRESS

akash1j8s87w3fctz7nlcqtkl5clnc805r240443eksx
Check that you have sufficient balance on your Akash wallet
akash query bank balances --node $AKASH_NODE $ACCOUNT_ADDRESSYou should see a response similar to
balances:
- amount: "93000637"
  denom: uakt
pagination:
  next_key: null
  total: "0"
If you don’t have a balance, check out Funding your account and look for the Faucet URL.
4. Build Thorchain BEPSwap UI Container
You can skip this process and go to 5. Create the Deployment if you’d like to use my already existing docker image edouardl/thorchain-bepswap-web-ui
The docker image set in this guide edouardl/thorchain-bepswap-web-uiwill deploy the testnet version of BEPSwap. The guide explains how to build and push your own image to the Docker registry. If you want to deploy Mainnet, you will need to change the variables accordingly before building your own image.
Get the source code:
git clone https://github.com/thorchain/bepswap-web-uicd bepswap-web-uiInstall dependencies using:yarn install
Add serve dependency using:yarn add serve
Create a Procfile to define the web process:
cat > Procfile <<EOF
web: yarn serve -s build
EOF
We will be using Heroku Buildpacks with Buildpacks.io to build our container. Pick an image name and store it in IMAGE environment variable. I chose edouardl/thorchain-bepswap-web-ui as my image name, you should choose <docker-id>/thorchain-bepswap-web-ui as yours. If you don’t have yet a Docker ID you’ll need to signup.
export IMAGE=edouardl/thorchain-bepswap-web-uiTo build the container, run:
pack build $IMAGE --builder heroku/buildpacks:18Run the docker image locally to verify it works:
docker run -it --rm -e NODE_ENV=production -p 5000:5000 $IMAGEVerify by visiting http://localhost:5000 on your browser.
Push the image to Docker Hub (Container Registry) using:
docker push $IMAGE5. Create the Deployment
Create a deployment configuration thorchain.yml to deploy the edouardl/thorchain-bepswap-web-ui for ThorChain BEPSwap Web UI Node JS app container using SDL.
You can use curl to download the thorchain.yml file directly.
curl -s https://raw.githubusercontent.com/ovrclk/awesome-akash/master/Thorchain-BEPSwap/thorchain.yml > thorchain.ymlOr copy/paste the below
---
version: "2.0"
services:
  web:
    image: edouardl/thorchain-bepswap-web-ui
    expose:
      - port: 5000
      as: 80
      to:
        - global: true
profiles:
  compute:
    web:
      resources:
        cpu:
          units: 0.1
        memory:
          size: 512Mi
        storage:
          size: 512Mi
  placement:
    westcoast:
      attributes:
        organization: ovrclk.com
      signedBy:
        anyOf:
          - "akash1vz375dkt0c60annyp6mkzeejfq0qpyevhseu05"
      pricing:
        web:
          denom: uakt
          amount: 3000
deployment:
  web:
    westcoast:
      profile: web
      count: 1
6. Deploy
In order to deploy, run the below command
akash tx deployment create thorchain.yml --from $KEY_NAME --node $AKASH_NODE --chain-id $AKASH_CHAIN_ID --fees 5000uakt -yThis posts the deployment to the Akash DeCloud marketplace where you will get matched with a provider.
After a few seconds ⏱, your lease becomes active. You can query the status of the lease using the below command.
akash query market lease list --owner $ACCOUNT_ADDRESS --node $AKASH_NODE --state activeOnce it is active, you should see something similar to below
- lease_id:
    dseq: "160398"
    gseq: 1
    oseq: 1
    owner: akash1j8s87w3fctz7nlcqtkl5clnc805r240443eksx
    provider: akash1uu8wfvxscqt7ax89hjkxral0r2k73c6ee97dzn
  price:
    amount: "51"
    denom: uakt
  state: active
pagination:
  next_key: null
  total: "0"
In the information above, the price amount denotes how many uakt (akt 10^-6) the lease is costing per block.
We will now export the values for Provider, Dseq, Oseq and Gseq in order to upload the manifest and deploy the image. Use the values you get from your own lease, not the below ones.
export DSEQ=160398
export OSEQ=1
export GSEQ=1
export PROVIDER=akash1uu8wfvxscqt7ax89hjkxral0r2k73c6ee97dzn
We can verify that the values are populated by running
echo $PROVIDER $DSEQ $OSEQ $GSEQYou should see a response similar to:
akash1uu8wfvxscqt7ax89hjkxral0r2k73c6ee97dzn 160398 1 1Upload the manifest using the values from the above step:
akash provider send-manifest thorchain.yml --node $AKASH_NODE --dseq $DSEQ --oseq $OSEQ --gseq $GSEQ --owner $ACCOUNT_ADDRESS --provider $PROVIDERYour image is now deployed, once you uploaded the manifest. You can retrieve the access details by running the below:
akash provider lease-status --node $AKASH_NODE --dseq $DSEQ --oseq $OSEQ --gseq $GSEQ --provider $PROVIDER --owner $ACCOUNT_ADDRESSYou should see a response similar to:
{
  "services": {
    "web": {
      "name": "web",
      "available": 1,
      "total": 1,
      "uris": ["300cl9s3ulbph244b6qqp6dkm0.provider3.akashdev.net"],
      "observed-generation": 0,
      "replicas": 0,
      "updated-replicas": 0,
      "ready-replicas": 0,
      "available-replicas": 0
    }
  },
  "forwarded-ports": {}
}
You can access the application by visiting the hostnames mapped to your deployment. In the above example, it is http://300cl9s3ulbph244b6qqp6dkm0.provider3.akashdev.net.
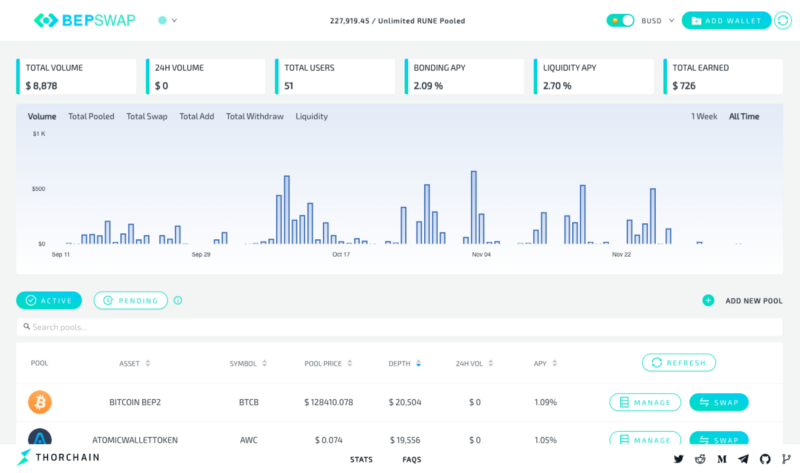
The link might lead to 404 since I closed the deployment to keep resources for others on the testnet.
If your deployment went well, you should see something like that.
7. Service Logs
You can view the logs for your application using akash provider service-logs, for example:
akash provider service-logs --node $AKASH_NODE --dseq $DSEQ --oseq $OSEQ --gseq $GSEQ --provider $PROVIDER --owner $ACCOUNT_ADDRESS --service webYou should see a response similar to:
[web-7447d7769-c6t4f] yarn run v1.22.10[web-7447d7769-c6t4f] $ /workspace/node_modules/.bin/serve build[web-7447d7769-c6t4f] INFO: Accepting connections at http://localhost:50008. Close your deployment
When you are done with your application, close the deployment. This will free up your container and stop the token transfer. Close deployment by creating a deployment-close transaction:
akash tx deployment close --node $AKASH_NODE --chain-id $AKASH_CHAIN_ID --dseq $DSEQ --owner $ACCOUNT_ADDRESS --from $KEY_NAME -y --fees 5000uaktAdditionally, you can query the market to check if your lease is closed:
akash query market lease list --owner $ACCOUNT_ADDRESS --node $AKASH_NODEYou should see a response similar to:
leases:
  - lease_id:
      dseq: "160398"
      gseq: 1
      oseq: 1
      owner: akash1j8s87w3fctz7nlcqtkl5clnc805r240443eksx
      provider: akash1uu8wfvxscqt7ax89hjkxral0r2k73c6ee97dzn
    price:
      amount: "186"
      denom: uakt
    state: closed
pagination:
  next_key: null
  total: "0"
Congrats 🥳
You managed to deploy an awesome DeFi application using Akash DeCloud. Many more projects can be deployed on Akash, and the long list on Awesome Akash is more like initial inspiration. Akash has the potential to break the current cloud oligopoly and make web infrastructure more decentralized and more resilient. Another application I am very interested in is blockchain nodes. Some PoS networks have around 70%+ of their nodes running with the same cloud provider, which somehow creates a single point of failure. Akash supports blockchain nodes and Akash on Akash is a good guide to get started for Cosmos SDK nodes.
Get to know more
- Stakin Official Website: Stakin operates a validator node on the Akash Mainnet network. If you liked this content, you can support our validator by delegating your AKT to it and earning inflation rewards.
- Akash Official Website
- The Akashian Challenge
- Akash Whitepaper
- ThorChain
- ThorChain BEPSwap
DISCLAIMER: This guide is intended for developers and for testnet deployments only. This is not financial advice. Blockchain and cryptocurrencies involve a high degree of risk, and there is always the possibility of loss, including the loss of all staked digital assets.

Join the conversation