

Stakin guide to using the Crypto.com DeFi wallet to stake your $CRO
Crypto.org Chain is a proof-of-stake (PoS) blockchain network, and CRO Staking is enabled for everyday users via the delegated-proof-of-stake (DPoS) consensus protocol.
Users can entrust their native CRO tokens to a reputable Validator. Validators run nodes on the Crypto.org Chain network to validate transactions and earn block rewards in CRO, which are then distributed to Delegators after a Validator commission is taken. Please note that Crypto.org Chain Staking necessitates staking native CRO on the Crypto.org Chain Mainnet rather than ERC20 CRO on the Ethereum network.
While you can also stake your CRO via the crypto.com app and exchange, you may have noticed that this is a centralized solution. We recommend using the decentralized approach, and thus you can stake with a decentralized wallet via the DeFi Wallet of crypto.com.
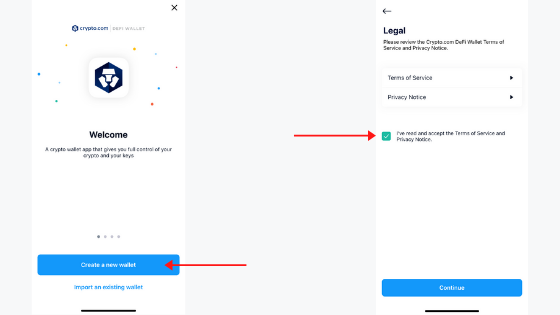
To do so, please go to: https://crypto.com/eea/defi-wallet and download the app for iOS or Android. Open the app and select “Create a wallet”. Next, you will be shown the “terms of service” and “privacy notice” take your time and read through them. Once finished, select “Continue”.
Next, you will be asked to create a passcode. Click on “create passcode” and enter a 6-digit code to continue. Be sure to write down the code or memorize it, as this will give you access to the app. Once you’ve filled out your desired passcode, you can enable 2-factor authentication and, if applicable for your cell phone, Face ID. We recommend always enabling 2-factor authentication to keep your assets and account safe.
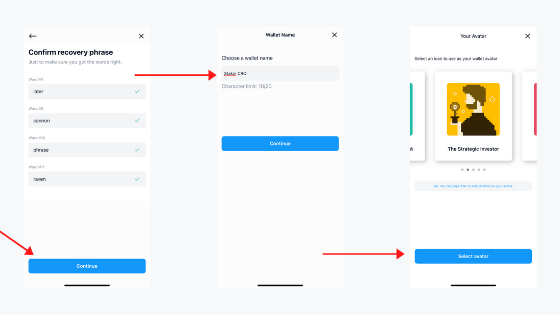
You will now be given a recovery phrase. Select “Reveal my recovery phrase”. You’ll need to swipe to reveal each word. Write them down in the right order and check if you’ve noted them all correctly. If so, select “Continue”. Confirm your recovery phrase by inserting the requested words (see image below).

Once you’ve done so, all you require to do is choose a wallet name and select “continue” to open the dashboard.
To send $CRO to your wallet, you can either buy it directly in the Crypto.com app, or select “receive” to send the $CRO from another wallet to yours. Make sure to double-check your wallet address to avoid any problems.
Let’s Get To Staking
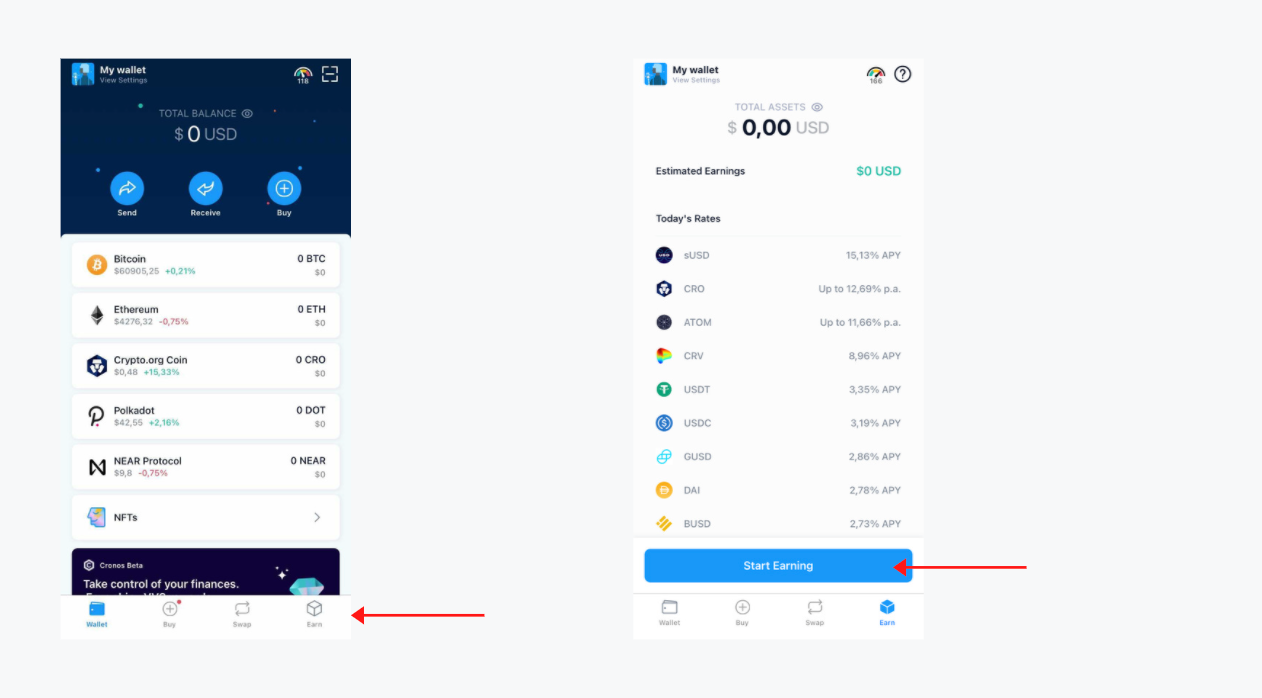
To start staking your $CRO, please select “Earn” on the bottom right menu in the DeFi Wallet dashboard. If you’ve never used this feature before, the number of assets on the earn menu should be zero dollars. To start, select “Start Earning”.
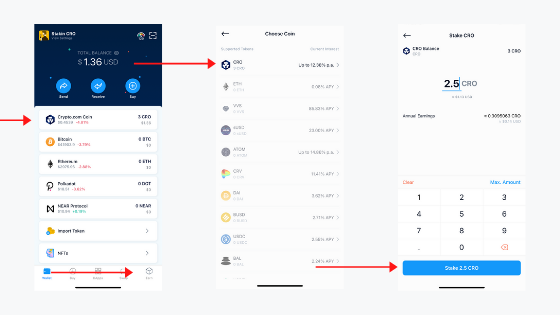
It’s now time to choose your asset. Select $CRO by clicking on the little arrow on the right side of the asset (see image below). Next, fill in the number of assets that you’d like to stake, and select “Stake CRO” on the bottom of your screen.
Next, the validator list will appear. Scroll down to find the validator of your choice, or type the name of your validator in the search box above. Next, click on the name of the validator and select “Confirm Validator”.
You’ll now see an overview of all the data. Look through the information and select “confirm stake” to confirm your decision once again.
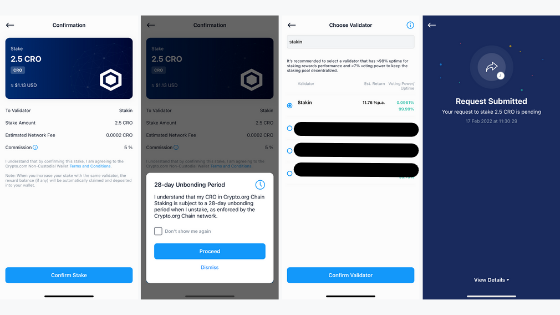
Once your request is submitted, you should see a similar screen as on the left-side image below. For more details on your transaction, select “View Details”.
You’ve now staked your $CRO assets. If you do not see your assets staked as in the right image above, please close the app and open it again. It might take a few seconds before any changes are noted in the app.
DISCLAIMER: This is not financial advice. Staking, delegation, and cryptocurrencies involve a high degree of risk, and there is always the possibility of loss, including the failure of all staked digital assets. Additionally, delegators are at risk of slashing in case of security or liveness faults on some protocols. We advise you to do your due diligence before choosing a validator.
Join the conversation